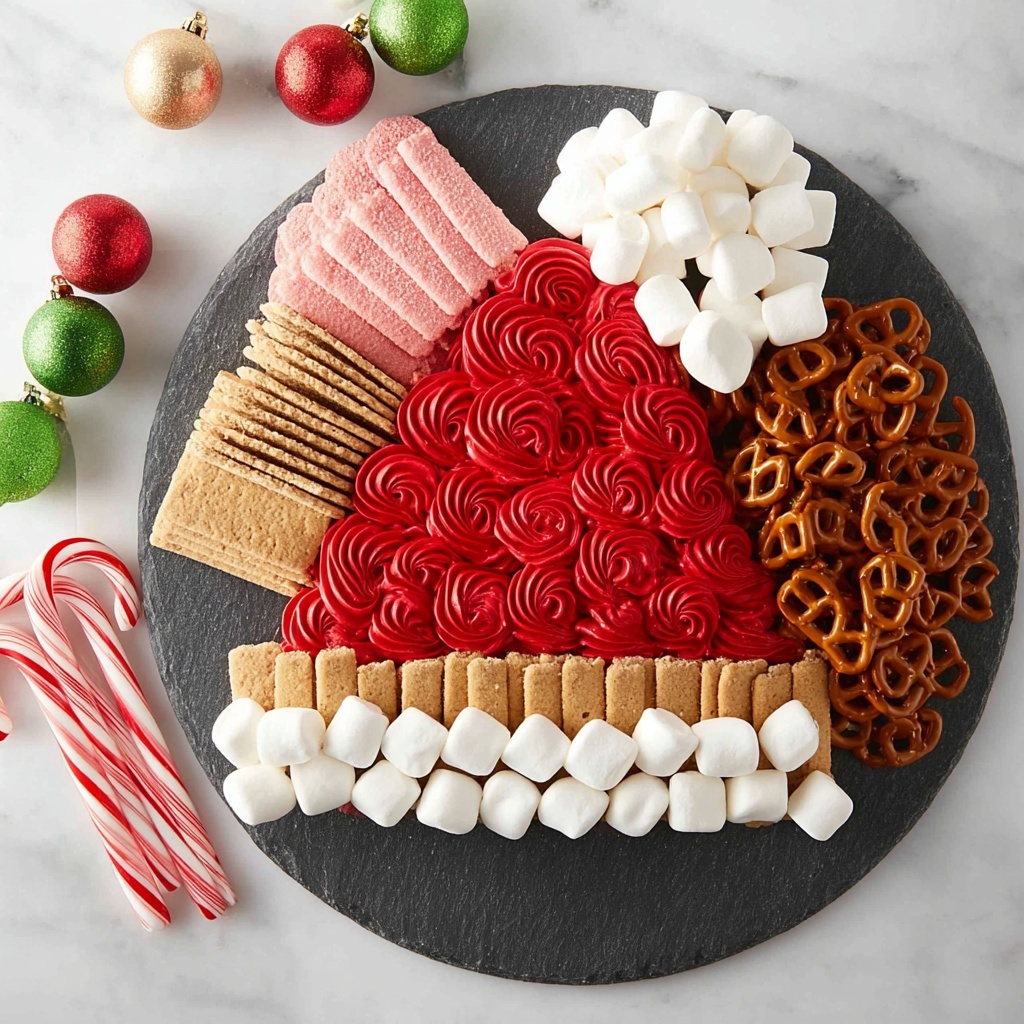
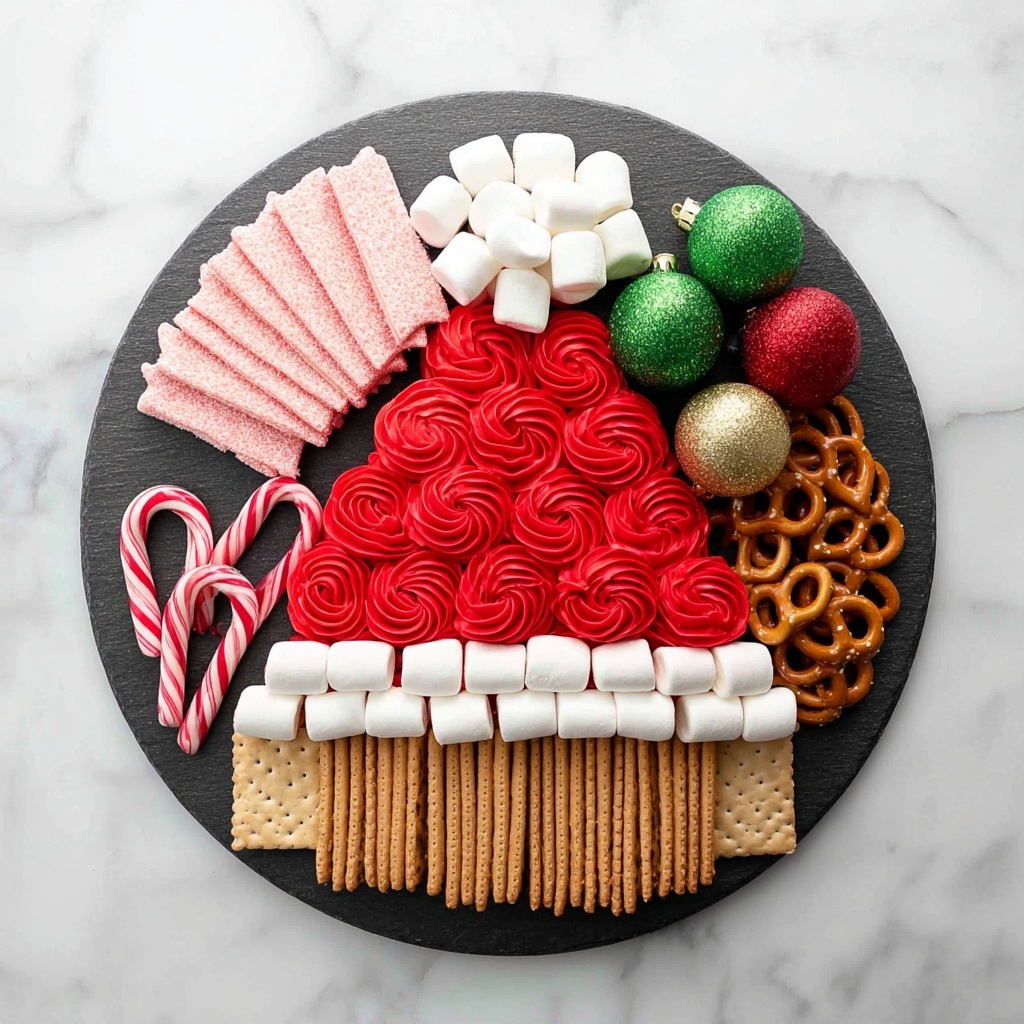
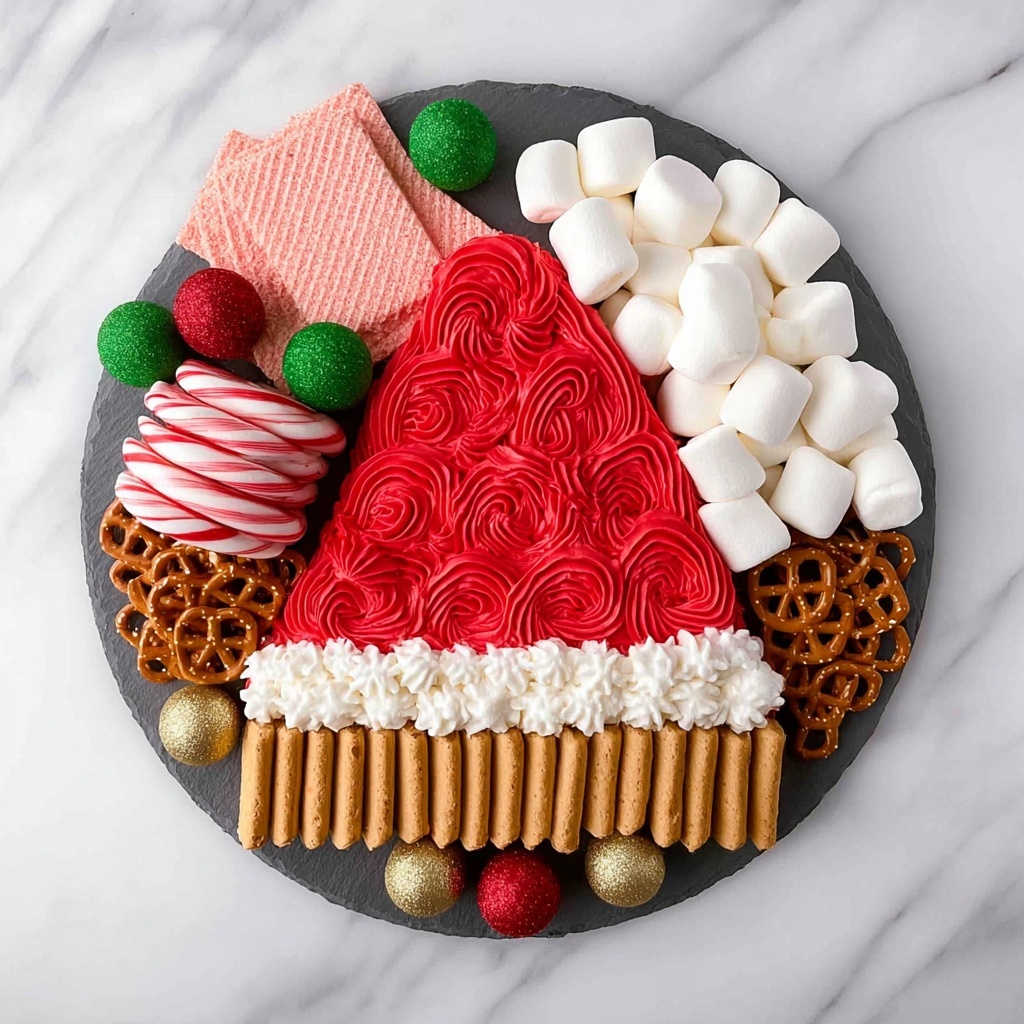
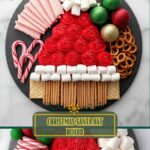
If you’re looking for a festive, fun, and utterly delightful way to celebrate the season, you have to try this Easy Buttercream Santa Hat Board Recipe. Imagine a beautiful board adorned with fluffy buttercream rosettes in vivid red and white, styled perfectly into a Santa hat shape and surrounded by a variety of delicious treats. It’s both a stunning centerpiece and a tasty assortment that invites everyone to dig in. Whether you’re hosting a holiday party or simply want to impress your family with something sweet and spirited, this recipe is your go-to festive showstopper.
Ingredients You’ll Need
The magic of this Easy Buttercream Santa Hat Board Recipe lies in its simplicity. Each ingredient works together to create a balance of creamy texture, vibrant color, and a little crunch that keeps every bite interesting. These straightforward components are easily found in stores, making this recipe accessible for any level of baker or entertainer.
- 1 store bought can of red frosting: The bright red frosting forms the main part of the Santa hat and adds that classic festive pop of color.
- 1 store bought can of white frosting: Perfect for the fluffy trims and star at the top of the hat, bringing the buttery creaminess needed.
- 1 cup mini pretzels: Adds a delightful salty crunch that complements the sweetness of the frosting and other treats.
- 1 small pack Biscoff cookies: These spiced cookies bring warmth and depth with their signature caramelized flavor.
- 1 small pack strawberry wafer cookies: Light and fruity wafers that add a subtle tartness and fun texture to the board.
- 1 cup mini marshmallows: Small, pillowy marshmallows that echo the softness of the buttercream and boost the wintery vibe.
- 1 cup standard size marshmallows: These larger marshmallows provide volume and a “snowball” effect on the board.
How to Make Easy Buttercream Santa Hat Board Recipe
Step 1: Smooth and Fluffy Frosting Prep
Start by smoothing out your store bought frostings. If you have a handheld mixer, use just one beater and insert it directly into the frosting can. After about 45 seconds, you’ll notice the frosting becomes beautifully smooth and fluffy, which is key to piping those eye-catching rosettes.
Step 2: Repeat for Both Colors
Give the same love to both your red and white frostings to ensure consistency in texture. This step is crucial because you want the rosettes to pipe out perfectly whether red or white, looking fresh and almost homemade.
Step 3: Prepare Your Piping Bags
Next, fit two piping bags with 1M tips, which are perfect for swirls and rosettes. This no-fuss piping tip brings the professional look to your buttercream that makes the Santa hat stand out.
Step 4: Fill the Bags
Carefully spoon the whipped red frosting into one piping bag, and the silky white frosting into the other. Having two bags ready lets you switch between colors seamlessly as you build your Santa hat.
Step 5: Plan Your Santa Hat Placement
Decide where your Santa hat will sit on the board—centered or slightly off to one side. I like going off center, especially if you plan to add longer wafer cookies or treats; it balances the composition nicely and looks inviting.
Step 6: Start Piping Rosettes
Lift your piping bag slightly above the board to keep the rosettes tall and full. Squeeze steadily as you pipe circles, allowing each rosette to build on the previous one. Avoid dragging the tip to keep the rosettes fluffy and defined.
Step 7: Build the Hat Shape
Continue piping rows of rosettes until you form a triangular, hat-like shape. Concentrate the red rosettes until the bulk of your Santa hat is formed.
Step 8: Add the Base and Star Tip Detail
Create a thicker line of white rosettes at the bottom to mimic the furry trim of the hat. For the iconic pom-pom at the tip, use a star tip technique: squeeze frosting, pause, then pull away gently to form a textured, cotton-ball-like star.
Step 9: Finish with Treats
Finally, arrange your mini pretzels, Biscoff cookies, strawberry wafers, and marshmallows around the hat. These add color, texture, and delight, making your board a feast for both eyes and palate.
How to Serve Easy Buttercream Santa Hat Board Recipe
Garnishes
To make your Santa hat board extra inviting, consider adding a few edible garnishes. Fresh strawberries or crushed peppermint candies sprinkled sparingly can bring brightness and sparkle, complementing the easy buttercream rosettes beautifully.
Side Dishes
This board shines on its own but pairs wonderfully with cozy winter drinks like hot cocoa or mulled cider. The contrast between warm drinks and the cool, fluffy frosting and crunchy treats elevates the entire experience.
Creative Ways to Present
Serve the board on a rustic wooden platter or a festive-themed tray to set the holiday mood. Add fairy lights around the edge for a magical glow that invites everyone to gather round and share. You might even let guests customize their own mini “Santa hats” by piping their own rosettes on small cookies or crackers nearby.
Make Ahead and Storage
Storing Leftovers
If you have any leftovers, cover the board tightly with plastic wrap to keep the buttercream fresh and soft. Store it in the fridge and consume within 2-3 days for the best texture and flavor.
Freezing
Freezing a buttercream board isn’t ideal because the frosting can change texture upon thawing. Instead, freeze individual cookies or marshmallows separately if you want to keep components longer and assemble fresh closer to serving time.
Reheating
Reheating isn’t necessary or recommended since this recipe is all about the cool, creamy buttercream and crisp, fresh treats. Just let any refrigerated leftovers come to room temperature before serving to soften the buttercream slightly.
FAQs
Can I make the buttercream from scratch for this recipe?
Absolutely! While this recipe is designed to be simple with store bought frosting, making your own buttercream can add a personal touch. Just be sure to whip it until smooth and fluffy to pipe those perfect rosettes.
What can I substitute if I don’t have mini pretzels?
If mini pretzels aren’t available, rice crackers or lightly salted nuts work wonderfully as crunchy, salty alternatives that balance the sweetness on the board.
How long will the buttercream stay fresh on the board?
At room temperature, buttercream is best served within a few hours. If you’re making your board ahead, keep it refrigerated and bring to room temperature just before serving for the best experience.
Can I prepare the rosettes in advance?
You can pipe the rosettes a day ahead and keep the board chilled overnight. Just make sure it’s well covered to prevent drying out and store in a cool place.
Is this recipe suitable for kids to help with?
Definitely! Kids will love piping the rosettes and arranging treats. It’s a fun, hands-on way to get them involved in holiday baking and decorating.
Final Thoughts
This Easy Buttercream Santa Hat Board Recipe is such a joyful way to celebrate the holidays. It brings together simple ingredients and easy techniques to create a board that looks impressive but is truly a breeze to make. I can’t wait for you to try it and watch as your friends and family gather around marveling at your festive creativity. Happy piping and happy holidays!
Print
Easy Buttercream Santa Hat Board Recipe
- Prep Time: 20 minutes
- Cook Time: 0 minutes
- Total Time: 20 minutes
- Yield: 12 servings
- Category: Dessert Board
- Method: No-Cook
- Cuisine: American
Description
Create a festive and visually appealing Easy Buttercream Santa Hat Board perfect for holiday gatherings. Using store-bought red and white frosting, this no-cook recipe involves simple piping techniques to form a Santa hat shape on your serving board, decorated with an assortment of mini pretzels, biscoff cookies, strawberry wafer cookies, and marshmallows. Ideal for impressing guests with minimal effort and maximum holiday cheer.
Ingredients
Frosting
- 1 store bought can of red frosting
- 1 store bought can of white frosting
Decorations
- 1 cup mini pretzels
- 1 small pack biscoff cookies
- 1 small pack strawberry wafer cookies
- 1 cup mini marshmallows
- 1 cup standard size marshmallows
Instructions
- Mix Frosting: Using a handheld mixer with one beater, insert it into the can of red frosting and mix for about 45 seconds until the frosting becomes smooth and fluffy.
- Mix White Frosting: Repeat the mixing process for the white frosting using the handheld mixer to achieve the same smooth and fluffy texture.
- Prepare Piping Bags: Fit two piping bags with 1M piping tips, one for the red frosting and one for the white.
- Fill Piping Bags: Spoon the red frosting into one bag and the white frosting into the other.
- Position Hat Location: Decide where to place the Santa hat on your serving board; either in the center or off-center depending on your design preference and the size of your cookies and wafers.
- Start Rosettes: Hold the piping bag slightly above the board and squeeze with consistent pressure to pipe circular rosettes without dragging the tip across the board, maintaining their shape.
- Build Hat Shape: Continue piping rows of red rosettes, layering rows until the triangular Santa hat shape is formed.
- Add Hat Trim: Pipe a longer horizontal line of white rosettes at the base of the hat to represent the fluffy brim.
- Create Star Tip: Using the white frosting bag, pipe a small “star tip” cotton ball at the tip of the hat by squeezing a little frosting, stopping the squeeze, and pulling the tip off to form a textured peak.
- Decorate Board: Arrange your mini pretzels, biscoff cookies, strawberry wafer cookies, and marshmallows artistically around the Santa hat to complete the festive board.
Notes
- Using a handheld mixer to smooth frosting creates a better piping texture, making rosettes easier to form.
- Position your Santa hat off-center if using longer cookies or wafers to balance the board visually.
- Ensure consistent pressure when piping to keep rosettes uniform and puffy.
- This recipe requires no cooking and can be customized with your favorite holiday treats.
- Using store-bought frostings cuts down prep time and simplifies the process.
