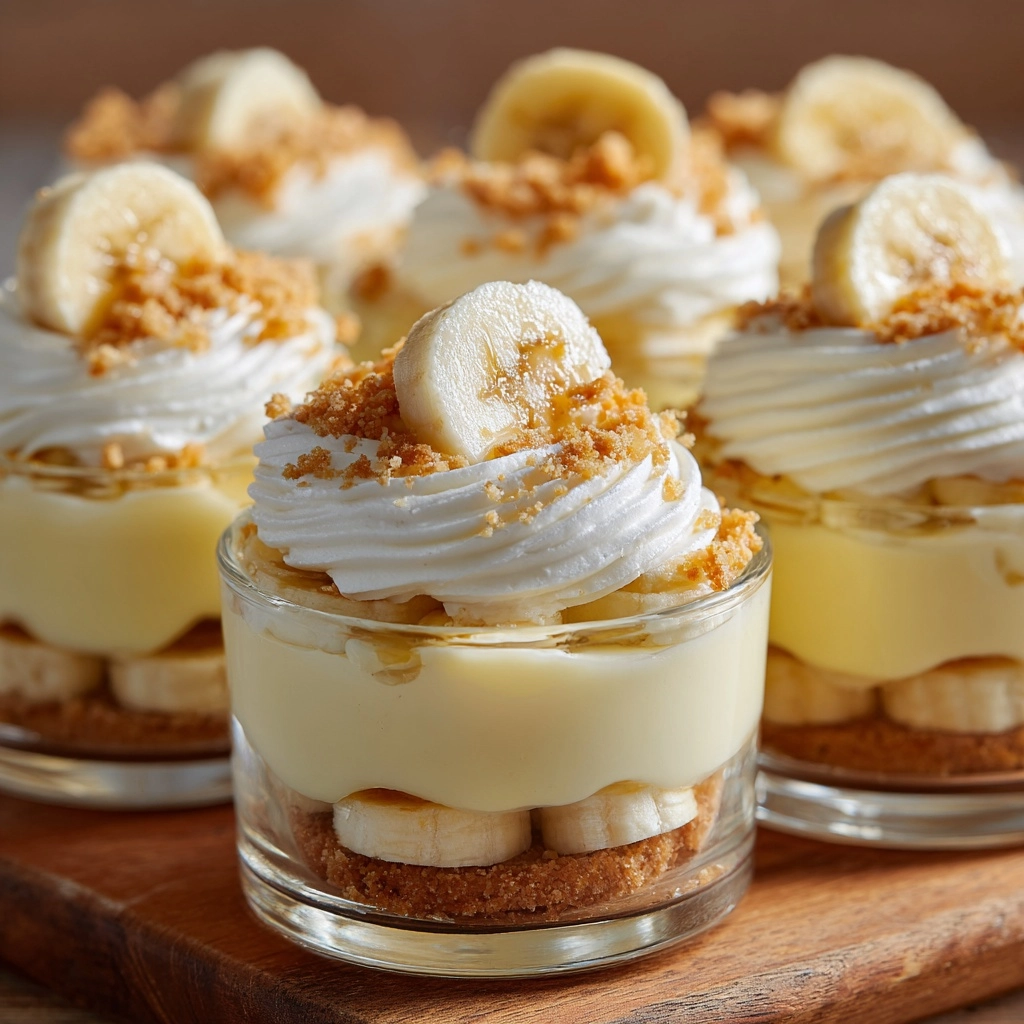
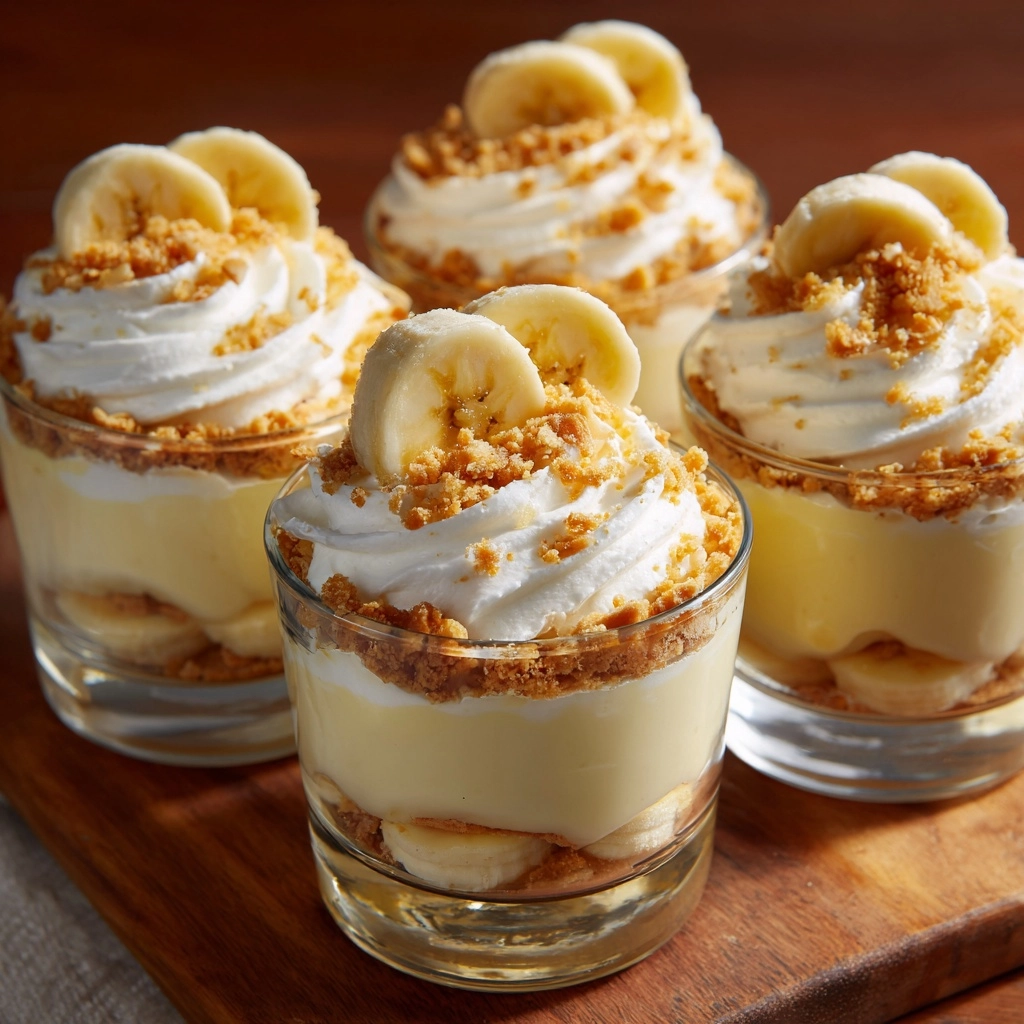
If you’re craving a dessert that feels like a warm hug in a cup, then this Banana Pudding Cups Recipe is going to be your new best friend. It’s creamy, dreamy, and packed with the perfect balance of sweet bananas, velvety pudding, and crunchy vanilla wafers, all layered beautifully to create a treat that’s as fun to eat as it is to make. Whether you’re serving it at a family dinner, a potluck, or just indulging your sweet tooth, this recipe brings all the nostalgic flavors of classic southern banana pudding into a charming individual portion size that’s impossible to resist.
Ingredients You’ll Need
These ingredients are simple, familiar, and each one plays a starring role in creating the magic of the Banana Pudding Cups Recipe. From the instant vanilla pudding giving luscious creaminess, to fresh bananas adding natural sweetness and texture, every element combines perfectly to make a dessert that’s both light and indulgent.
- Instant vanilla pudding mix: The base of the pudding, providing that classic, smooth vanilla flavor that’s essential here.
- Cold milk: Helps the pudding mix set up nicely, making it creamy and thick.
- Sweetened condensed milk: Adds richness and extra sweetness without overpowering the bananas.
- Heavy whipping cream: Whipped to soft peaks, it lightens the pudding mixture for a fluffy texture.
- Vanilla extract: A splash enhances the overall vanilla aroma, making every bite comforting and aromatic.
- Ripe bananas: Fresh slices bring natural sweetness and that iconic banana pudding taste.
- Crushed vanilla wafers: Layers of these add delightful crunch and classic flavor, plus some extra for topping.
- Whipped cream (optional): For an extra touch of indulgence and pretty presentation on top.
How to Make Banana Pudding Cups Recipe
Step 1: Prepare the Vanilla Pudding Mixture
Start by whisking the instant vanilla pudding mix into cold milk until it thickens and becomes smooth—this usually takes about two minutes. This quick step is crucial as it ensures that the pudding has the right creamy consistency without any lumps. Once thickened, stir in the sweetened condensed milk to infuse a luscious sweetness that’s rich but not cloying.
Step 2: Whip the Cream
Next, take your heavy whipping cream and vanilla extract and whip them until stiff peaks form. This adds a cloud-like lightness to the dessert that balances the pudding’s richness perfectly. When folded gently into the pudding base, it creates a mousse-like texture that’s simply irresistible.
Step 3: Assemble Your Cups
Begin by placing a layer of crushed vanilla wafers at the bottom of your serving cups or jars—this gives a satisfying crunch in every bite. Add a layer of fresh banana slices on top, then spoon a generous amount of the pudding mixture over the bananas. Repeat the layering once more, finishing with pudding on top so it’s ready for decorating.
Step 4: Garnish and Chill
Sprinkle additional crushed vanilla wafers over the top for texture and optionally dollop with whipped cream for extra flair. Pop the assembled cups into the fridge for at least one hour. Chilling allows the flavors to meld beautifully and helps the pudding firm up to the perfect consistency.
How to Serve Banana Pudding Cups Recipe

Garnishes
Elevate your Banana Pudding Cups Recipe by adding a few creative garnishes. A sprinkle of extra vanilla wafers brings crunch, while a small swirl of whipped cream adds creaminess and visual appeal. For a fun twist, try adding a few mini chocolate chips or a drizzle of caramel sauce to the top—it pairs wonderfully with the bananas and vanilla flavor.
Side Dishes
This dessert holds its own wonderfully, but if you want to round out a layered southern meal, consider serving alongside a lightly spiced pecan pie or simple fresh fruit salad. The creamy, cool texture of the pudding cups pairs beautifully with something crisp or festive on the side.
Creative Ways to Present
Banana Pudding Cups are perfect for portion control and popping right into individual jars or clear dessert cups where the pretty layers can be admired. For a crowd, line them up on a rustic wooden tray or tiered dessert stand for irresistible charm. You can even serve them in mason jars with colorful straws or spoons for a casual, picnic-friendly vibe that guests will adore.
Make Ahead and Storage
Storing Leftovers
If you happen to have any leftovers, cover the cups tightly with plastic wrap or transfer contents to an airtight container and store them in the refrigerator. They stay fresh and delicious for up to two days, so you can enjoy the flavors without worry.
Freezing
Freezing banana pudding can change its texture, especially with fresh bananas involved, so it’s not the best option. If you want to freeze, do so before adding the bananas and wafers, then thaw slowly in the refrigerator before assembly for best results.
Reheating
This Banana Pudding Cups Recipe is best served chilled, so reheating is not recommended. The creamy texture and fresh bananas shine when cold, making it ideal for enjoying straight from the fridge.
FAQs
Can I make this Banana Pudding Cups Recipe dairy-free?
Absolutely! You can substitute the milk and heavy cream with plant-based alternatives like almond milk and coconut cream. Just make sure to use a pudding mix that’s compatible with dairy-free liquids.
How ripe should the bananas be?
The bananas should be fully ripe with a few brown spots. This ensures maximum sweetness and softness but make sure they’re not overripe and mushy, or they might make the pudding watery.
Can I use homemade pudding instead of instant mix?
Yes, if you prefer making your pudding from scratch, it works beautifully! Just be mindful that homemade pudding can be less firm, so you might want to chill it a bit longer before assembling your cups.
What’s the best way to crush vanilla wafers?
Place them in a zip-top bag and gently crush with a rolling pin or the bottom of a heavy pan until you have small, bite-sized pieces—not too fine, so you retain some crunch.
Can I prepare these cups the day before serving?
Definitely! In fact, making them the day before allows all those wonderful flavors to meld together even more deeply. Just keep them refrigerated and add whipped cream garnish right before serving for freshness.
Final Thoughts
This Banana Pudding Cups Recipe is a delightful way to enjoy a beloved classic in a charming, no-fuss format. It’s quick to whip up, layered with textures, and bursting with comforting flavors that will have everyone asking for seconds. I can’t wait for you to try it and make it your own little tradition to share and savor.
Print
Banana Pudding Cups Recipe
- Prep Time: 20 minutes
- Cook Time: 0 minutes
- Total Time: 1 hour 20 minutes
- Yield: 6 servings
- Category: Dessert
- Method: No-Cook
- Cuisine: American
- Diet: Vegetarian
Description
Delightful Banana Pudding Cups featuring layers of creamy vanilla pudding, fresh bananas, and crunchy vanilla wafers. This no-bake dessert is easy to assemble, chilled to perfection, and perfect for satisfying your sweet tooth with a classic Southern treat.
Ingredients
Banana Pudding
- 1 (3.4 oz) box instant vanilla pudding mix
- 2 cups cold milk
- 1 (14 oz) can sweetened condensed milk
- 1 1/2 cups heavy whipping cream
- 1 teaspoon vanilla extract
Additional Ingredients
- 4 ripe bananas, sliced
- 1 1/2 cups crushed vanilla wafers, plus extra for topping
- Whipped cream for garnish (optional)
Instructions
- Prepare Pudding Mixture: In a large bowl, whisk together the instant vanilla pudding mix and cold milk until smooth and thickened, about 2 minutes. Stir in the sweetened condensed milk and mix until fully combined to create a rich base.
- Whip Cream: In a separate bowl, whip the heavy whipping cream with vanilla extract until stiff peaks form. This whipped cream will add lightness and fluffy texture to the pudding.
- Fold Mixtures: Gently fold the whipped cream into the pudding mixture until light and fluffy, taking care not to deflate the airiness of the whipped cream.
- Assemble Cups: Layer crushed vanilla wafers at the bottom of small serving cups or jars. Add a layer of sliced bananas, then spoon a generous amount of the pudding mixture over. Repeat these layers once more, ending with pudding on the top.
- Garnish and Chill: Sprinkle additional crushed vanilla wafers on top and add a dollop of whipped cream if desired. Chill the assembled cups in the refrigerator for at least 1 hour to allow the pudding to set and flavors to meld beautifully.
Notes
- Best enjoyed within 2 days to maintain freshness and texture.
- For extra texture and flavor, add mini chocolate chips or drizzle with caramel sauce before chilling.
- Store-bought whipped topping can be used as a convenient shortcut for garnishing.

