“`html
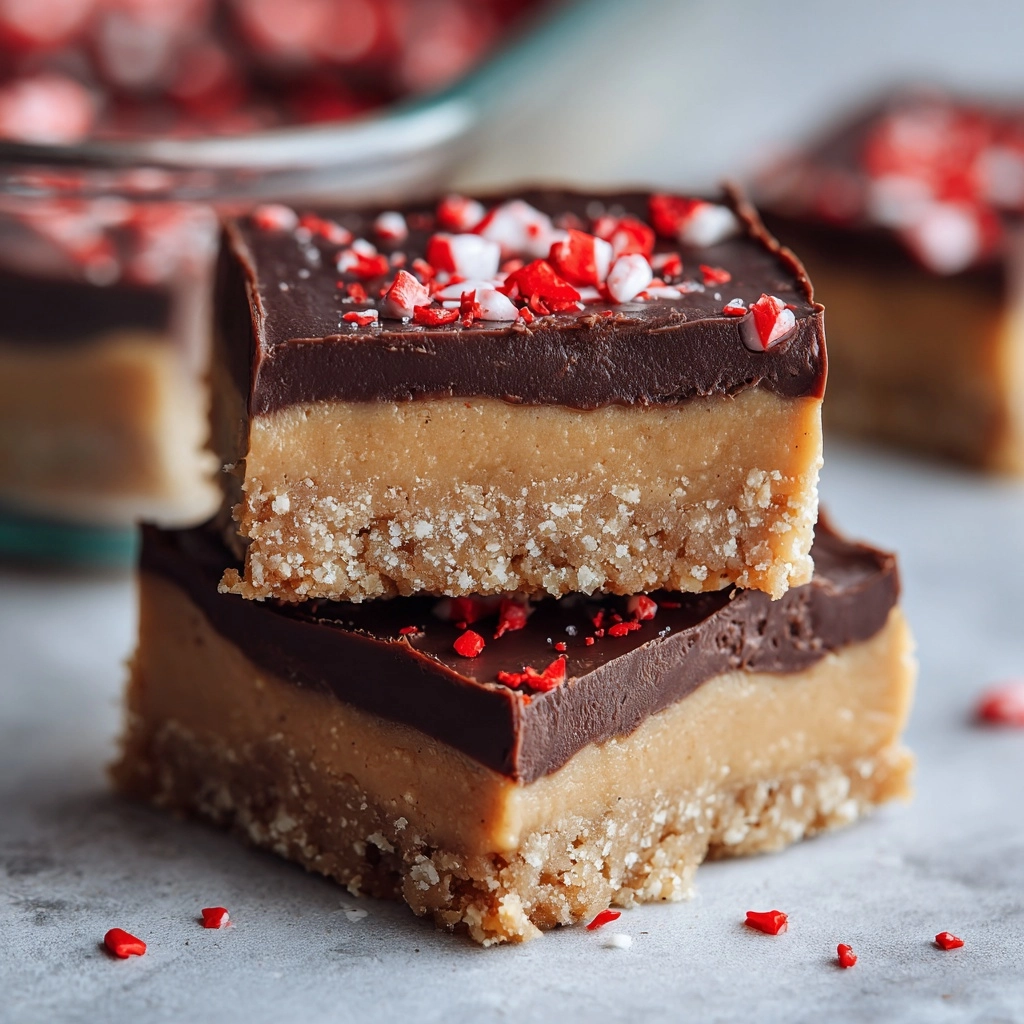
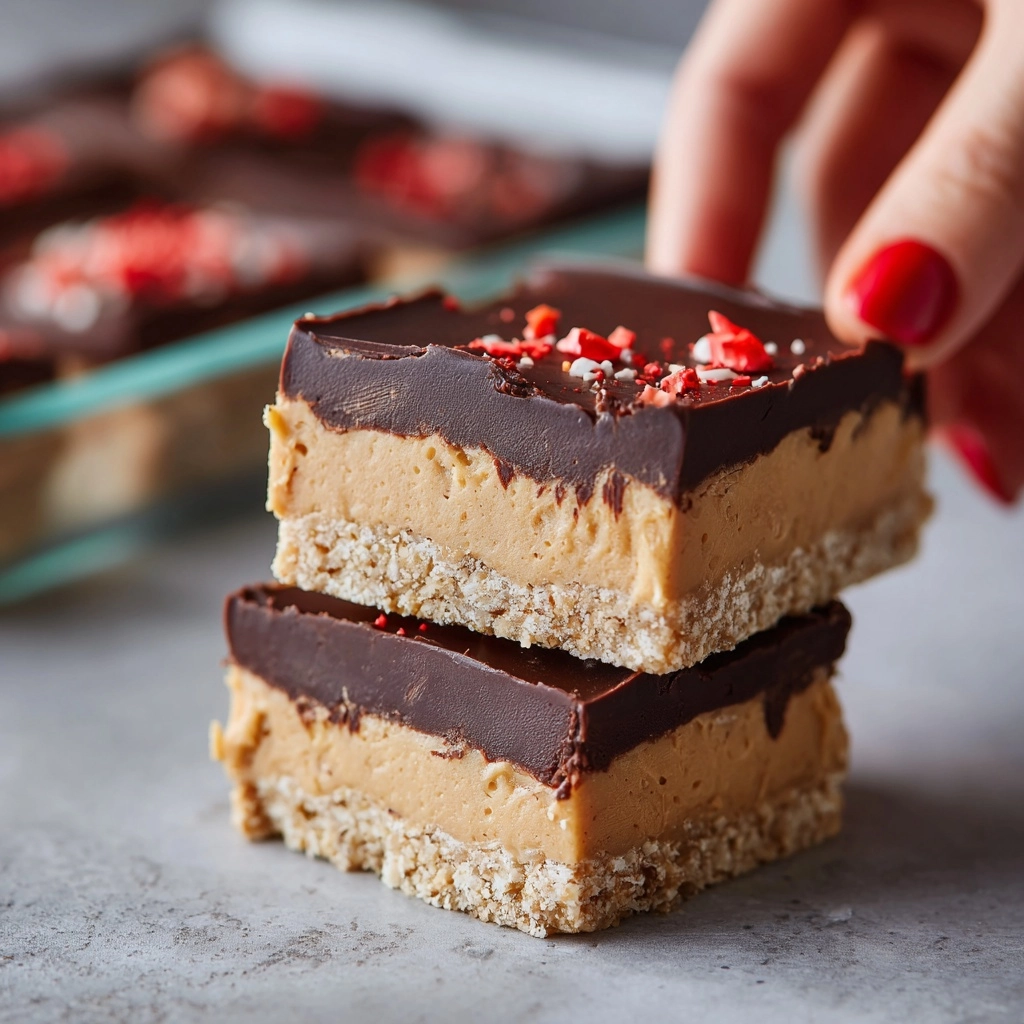
When you want a dessert that’s easy, decadent, and guaranteed to bring smiles, this Peanut Butter Bars Recipe is your new best friend. Combining the rich creaminess of peanut butter with a crispy graham cracker base and a luscious chocolate topping, these bars hit all the right notes without any baking fuss. Whether you’re making them for a crowd or a cozy night in, they deliver that perfect balance of sweet and salty, crunchy and smooth, every single time.
Ingredients You’ll Need
Gathering simple, pantry-friendly ingredients is all it takes to create these irresistible bars. Each element plays a specific role in building layers of flavor and texture that will make your taste buds dance.
- Unsalted Butter (1 cup, melted): Gives the base a rich, buttery depth and helps bind the graham cracker crumbs together.
- Graham Cracker Crumbs (2 cups): Provides a crunchy, slightly sweet foundation that contrasts beautifully with the creamy layers.
- Powdered Sugar (2 cups): Adds sweetness and helps create a smooth, melt-in-your-mouth texture in the filling.
- Creamy Peanut Butter (1 cup plus 1/4 cup for topping): The star of the show—offering that classic nutty flavor and velvety consistency that defines these bars.
- Semisweet Chocolate Chips (1 1/2 cups): Brings a rich, slightly bittersweet chocolate layer to crown the bars with irresistible decadence.
How to Make Peanut Butter Bars Recipe
Step 1: Prepare the Base
Start by mixing the melted butter, graham cracker crumbs, powdered sugar, and 1 cup of creamy peanut butter in a large bowl. Stir well until the mixture is smooth and fully combined. Press this mixture firmly into the bottom of a greased or parchment-lined 9×13-inch baking dish, creating an even, solid crust that will hold the bars together beautifully.
Step 2: Make the Chocolate-Peanut Butter Topping
In a microwave-safe bowl, melt the semisweet chocolate chips together with the remaining 1/4 cup of peanut butter. Heat in 30-second intervals, stirring thoroughly between each burst until silky smooth. This luscious topping is what takes these bars over the top.
Step 3: Assemble and Chill
Pour the melted chocolate and peanut butter mixture evenly over the crust layer. Use a spatula to spread it out smoothly for a glossy finish. Then, place the entire dish in the refrigerator and chill for at least 2 hours or until the topping has set firm enough to slice.
Step 4: Cut and Serve
Once chilled and firm, cut the bars into squares or rectangles—about 24 pieces work perfectly. These bars can be enjoyed chilled straight from the fridge or brought to room temperature for a softer bite.
How to Serve Peanut Butter Bars Recipe

Garnishes
Enhance the presentation by sprinkling a few crushed peanuts or a dusting of cocoa powder on top. Adding a light drizzle of melted white chocolate can also create a lovely contrast and an elegant touch.
Side Dishes
Peanut Butter Bars pair wonderfully with a scoop of vanilla ice cream or a dollop of whipped cream to balance their sweetness. Fresh berries, like raspberries or strawberries, also provide a refreshing burst of tartness that complements the richness.
Creative Ways to Present
Serve these bars on a charming dessert platter with parchment paper for a rustic look. For parties, try stacking smaller, bite-sized squares on tiered trays or wrap individual bars in decorative wax paper tied with twine for cute, portable treats.
Make Ahead and Storage
Storing Leftovers
If you have any Peanut Butter Bars left over, no worries—they keep well in the refrigerator for up to 3 days when stored in an airtight container. This helps maintain their texture and freshness beautifully.
Freezing
You can freeze these bars to enjoy later by wrapping them tightly in plastic wrap and placing them in a freezer-safe container or bag. They’ll stay fresh for up to 2 months. Thaw in the refrigerator overnight before serving to preserve the best texture and flavor.
Reheating
While these bars are best served chilled or at room temperature, if you prefer a softer texture, warm them gently in the microwave for 10 to 15 seconds. Just be careful not to overheat, or the chocolate topping might become too melty.
FAQs
Can I use crunchy peanut butter instead of creamy?
Absolutely! Crunchy peanut butter adds a delightful texture contrast in the base, giving your bars an extra nutty crunch that some people love. Just keep in mind it might make the bars a bit more crumbly.
Do I have to use graham cracker crumbs?
Graham cracker crumbs give these bars their classic flavor and texture, but you can substitute with digestive biscuits or even crushed pretzels if you want a different twist or a bit more saltiness.
Is this recipe suitable for vegans?
This Peanut Butter Bars Recipe includes butter and chocolate chips that usually contain dairy, so it’s not vegan as written. However, you can swap in vegan butter and dairy-free chocolate chips to make it vegan-friendly.
Can I make these bars without a microwave?
Yes, you can melt the chocolate and peanut butter using a double boiler on the stove if you don’t have a microwave. Just stir constantly over low heat until it’s smooth and combined.
How do I prevent the chocolate topping from cracking?
Applying a smooth, even layer of the melted chocolate-peanut butter mixture, and chilling the bars at a consistent refrigerator temperature helps avoid cracks. Also, cutting the bars after they are completely set ensures clean edges.
Final Thoughts
This Peanut Butter Bars Recipe is a deliciously simple way to impress your family and friends with minimal effort. Its rich flavors and beautiful layers come together in perfect harmony, making it a dessert you’ll reach for again and again. Give it a try—you’ll soon discover why it’s one of those classic treats that never go out of style!
“`
Print
Peanut Butter Bars Recipe
- Prep Time: 15 minutes
- Cook Time: 0 minutes
- Total Time: 15 minutes (plus chilling time)
- Yield: 24 bars
- Category: Dessert
- Method: No-Cook
- Cuisine: American
- Diet: Vegetarian
Description
These Peanut Butter Bars are a decadent no-bake dessert combining a buttery graham cracker crust with creamy peanut butter and a rich chocolate topping. Easy to prepare and perfect for satisfying sweet cravings, they set in the refrigerator for a firm, luscious finish.
Ingredients
Crust and Filling
- 1 cup unsalted butter, melted
- 2 cups graham cracker crumbs
- 2 cups powdered sugar
- 1 cup creamy peanut butter
Topping
- 1 1/2 cups semisweet chocolate chips
- 1/4 cup creamy peanut butter
Instructions
- Prepare the Crust Mixture: In a large mixing bowl, combine the melted butter, graham cracker crumbs, powdered sugar, and 1 cup of creamy peanut butter. Stir thoroughly until the mixture becomes smooth and fully incorporated.
- Press the Crust: Firmly press the peanut butter crust mixture into the bottom of a greased or parchment-lined 9×13-inch baking dish, ensuring it is evenly spread and compacted.
- Melt the Chocolate Topping: In a microwave-safe bowl, melt the semisweet chocolate chips with 1/4 cup of creamy peanut butter. Heat in 30-second intervals, stirring well between each to achieve a smooth and silky mixture.
- Apply the Topping: Pour the melted chocolate and peanut butter mixture evenly over the prepared crust. Use a spatula to spread it smoothly across the surface.
- Chill to Set: Refrigerate the bars for at least 2 hours or until the chocolate topping is firm and set properly.
- Serve: Once set, cut into 24 bars and serve chilled or at room temperature for best texture and taste.
Notes
- Bars can be prepared up to 3 days in advance and stored in the refrigerator to maintain freshness.
- Use crunchy peanut butter instead of creamy for added texture and crunch.
- Ensure the bars are refrigerated long enough to fully set for easy slicing.
