
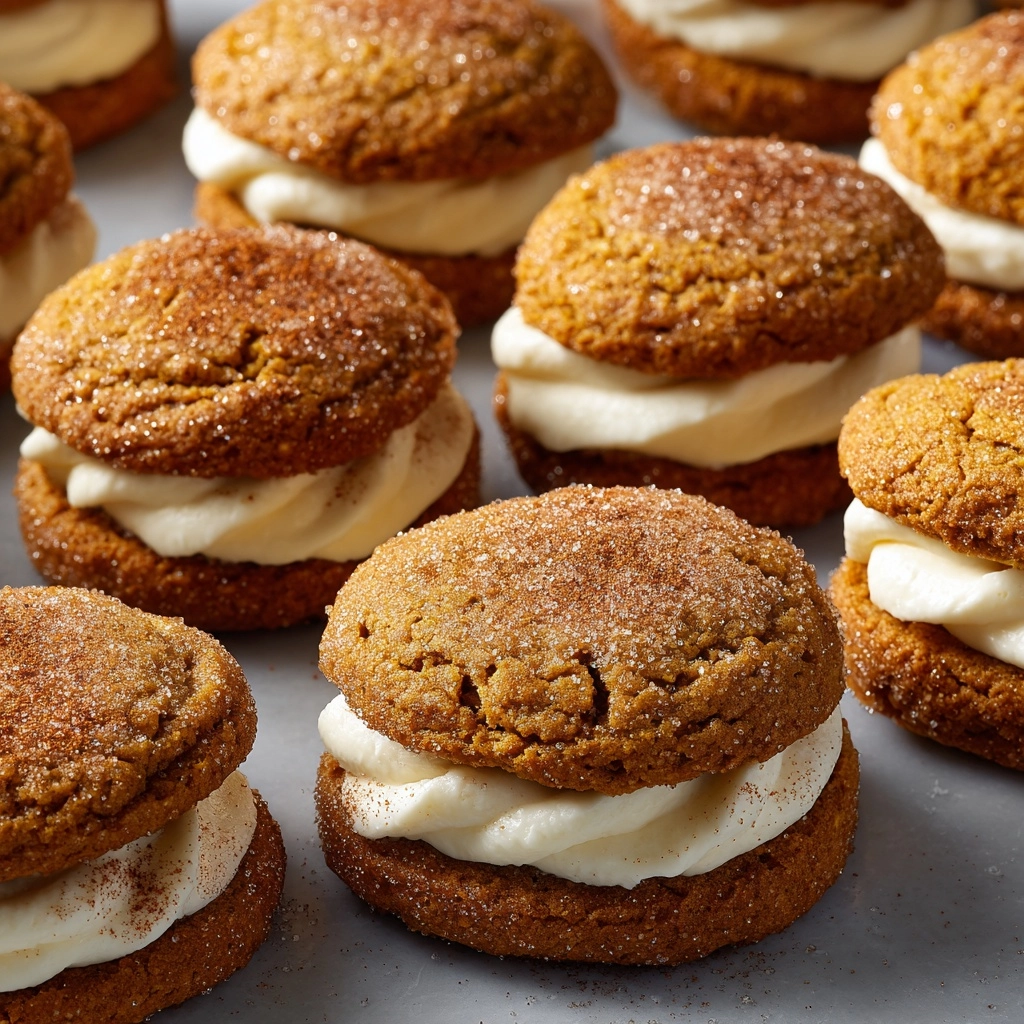
With their gently spiced aroma and a creamy, decadent center, Eggnog Snickerdoodle Thumbprint Cookies are the stuff of holiday dreams. Imagine the rich flavor of classic eggnog paired with the sugary, cinnamon-dusted magic of a snickerdoodle, all nestled together in a warm, soft cookie. They’re the kind of treat that feels extra special and festive—perfect for cookie swaps, family gatherings, or just brightening a chilly winter afternoon with someone you love.
Ingredients You’ll Need
One of the most wonderful things about Eggnog Snickerdoodle Thumbprint Cookies is that they use ingredients you probably already have, yet each one plays an important role. From creamy butter to aromatic spices and that lush eggnog filling, every component ensures these cookies are as flavorful and irresistible as they look.
- Unsalted Butter: Starts the cookie base with richness and yields seriously soft, tender cookies.
- Granulated Sugar: Sweetens the dough and rolls outside for classic snickerdoodle sparkle.
- Large Egg: Binds the dough and gives structure while keeping the cookies moist.
- Vanilla Extract: Adds depth and rounds out all the cozy cookie flavors.
- Rum Extract: Offers that iconic eggnog warmth with a subtle boozy hint—don’t skip it for classic holiday vibes!
- All-Purpose Flour: Gives the cookies their structure—light, chewy, and sturdy enough for that thumbprint center.
- Baking Soda: Ensures a bit of lift so each cookie is satisfyingly puffed and tender.
- Cream of Tartar: Essential for the signature snickerdoodle tang and pillowy texture.
- Ground Nutmeg: Brings unmistakable eggnog warmth and spice to both dough and coating.
- Salt: Balances the sweetness and enhances all the spices and flavors.
- Granulated Sugar (for rolling): Coats the dough balls for a sweet, sparkly finish.
- Ground Cinnamon: Forget snickerdoodles without cinnamon—this adds warmth and aroma to the rolling mix.
- Ground Nutmeg (for rolling): A little extra spice in the coating amplifies the eggnog aspect.
- Eggnog: The star of the creamy filling! Use your favorite brand; spiced varieties add even more holiday flair.
- Cornstarch: Thickens the eggnog filling beautifully so it sets up in the thumbprint.
- Powdered Sugar: Sweetens the filling and makes it silky-smooth.
- Optional Nutmeg for Dusting: For a final snowy sprinkle to really bring out the holiday magic.
How to Make Eggnog Snickerdoodle Thumbprint Cookies
Step 1: Prepare Your Baking Equipment
Preheat your oven to 350°F (175°C) and line a baking sheet with parchment paper. This ensures there’s no sticking, plus it makes for easy cleanup—win-win! Make sure both your oven and your pan are ready, because this dough comes together quickly once you start mixing.
Step 2: Cream Butter and Sugar
In a large bowl, cream together the softened butter and the initial cup of granulated sugar until the mixture turns even lighter and looks fluffy. This step sets your cookies up for a soft, tender texture. Patience here really pays off!
Step 3: Add Eggs and Flavors
Crack in your egg, pour in the vanilla and rum extracts, and beat until everything’s unified and smooth. That tiny bit of rum extract is truly the secret to Eggnog Snickerdoodle Thumbprint Cookies—delivering festive flavor without any fuss.
Step 4: Mix Dry Ingredients Separately
Whisk the flour, baking soda, cream of tartar, nutmeg, and salt together in another bowl. This even distribution of leavening and spice ensures you won’t end up with any bites of bitter soda (yikes!) and every cookie tastes just right.
Step 5: Combine Wet and Dry Mixtures
Gradually add the dry ingredients to the wet mixture, mixing slowly. Stop once all the flour is incorporated and your dough is thick but still gently soft. Take care not to overwork—it’s the secret to that signature snickerdoodle chew!
Step 6: Coat the Cookie Dough Balls
In a small bowl, mix the 1/4 cup of granulated sugar, cinnamon, and extra nutmeg. Scoop tablespoon-sized portions of dough, roll them into balls with your hands, and then coat each one in the spiced sugar mixture. This coating is what gives those cookies their iconic snickerdoodle sparkle and a whisper of crunch.
Step 7: Form the Thumbprints
Arrange the dough balls 2 inches apart on your lined baking sheet. Using your thumb (classic) or the back of a small spoon (less messy), gently press an indentation into the center of each ball. This creates the perfect little nest for your soon-to-be eggnog filling!
Step 8: Bake to Perfection
Bake the cookies for 10 to 12 minutes, just until the edges have set but the centers still look slightly underbaked—this ensures a chewy middle after cooling. Let them rest 5 minutes on the sheet before moving them, as this allows them to finish setting up.
Step 9: Make the Eggnog Filling
While your cookies bake, whisk together eggnog and cornstarch in a small saucepan over medium heat. Keep stirring as the mixture thickens (about 5 to 7 minutes, patience needed!), then remove from the heat and stir in powdered sugar until the filling is luscious and smooth.
Step 10: Assemble and Decorate
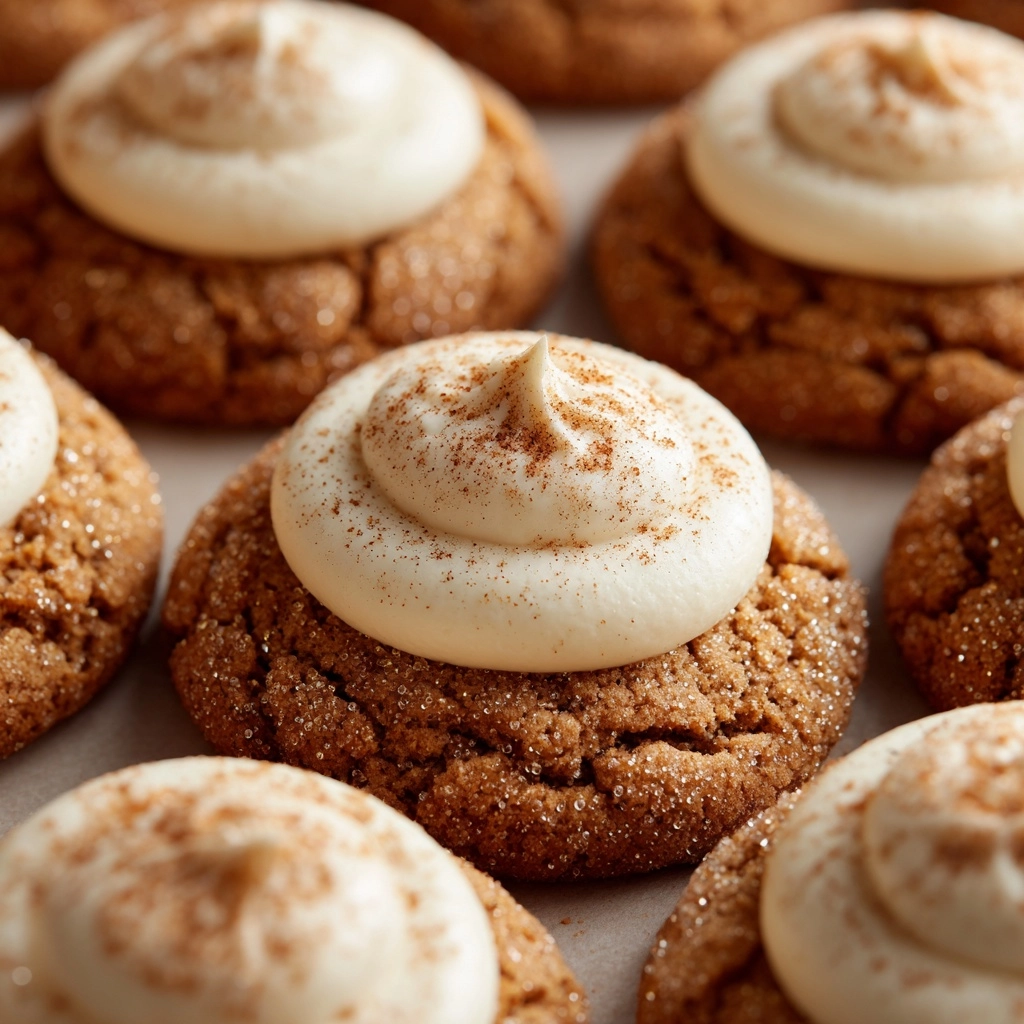
Transfer cookies to a wire rack to finish cooling. While both the cookies and filling are still slightly warm, spoon the creamy eggnog mixture into each thumbprint. Finish with a dusting of nutmeg, if you’d like a little extra festive flair. Let them set—the hardest step is waiting!
How to Serve Eggnog Snickerdoodle Thumbprint Cookies
Garnishes
A little extra nutmeg, freshly grated if you have it, makes these cookies look irresistible and adds that signature holiday aroma. You could even drizzle a thread of melted white chocolate over the set filling for an elegant finish.
Side Dishes
These cookies shine alongside a steaming mug of hot cocoa or strong coffee, but they’re just as delicious with a scoop of vanilla bean ice cream. For a truly festive touch, serve them on a platter next to other holiday favorites like peppermint bark or gingerbread men.
Creative Ways to Present
Go for a classic holiday cookie tin lined with parchment, or arrange these Eggnog Snickerdoodle Thumbprint Cookies on a tiered stand for an eye-catching dessert display. Tie them in cellophane bags with a festive ribbon and a handwritten tag—perfect homemade gifts!
Make Ahead and Storage
Storing Leftovers
Store these cookies in an airtight container at room temperature for up to 3 days. If you go longer or your kitchen is warm, consider popping them in the fridge to keep that eggnog filling fresh—just bring them back to room temperature before serving for best texture.
Freezing
To freeze, you can store the baked, unfilled cookies in a well-sealed bag or container for up to 2 months. When you’re ready to serve, thaw and fill with fresh eggnog filling. Alternatively, freeze the dough balls (before coating and baking) and bake fresh whenever the craving strikes.
Reheating
Cookies are best at room temperature, but if you’d like to soften them or give the filling a just-made taste, a quick 5 to 10 seconds in the microwave will do the trick. Avoid overheating so the filling does not liquefy.
FAQs
Can I make Eggnog Snickerdoodle Thumbprint Cookies with store-bought eggnog?
Absolutely! Store-bought eggnog works beautifully in this recipe. If you can find a spiced or full-fat version, it’ll make the filling extra rich and flavorful.
What if I don’t have rum extract?
You can simply leave out the rum extract or use a splash of actual rum if you’d like. Vanilla extract on its own will work, but the rum extract really gives that authentic eggnog flavor.
Why did my cookies spread too much?
This can happen if your butter is too soft, or if the dough is warm. If your dough feels very soft, pop it in the fridge for 20 minutes before portioning and baking to help keep the cookies tall and chewy.
Can I make these cookies gluten-free?
Yes! Substitute a 1:1 gluten-free all-purpose flour blend for the regular flour. Just check that your cream of tartar and baking soda are gluten-free, and you’re set for gluten-free Eggnog Snickerdoodle Thumbprint Cookies.
What’s the best way to get the perfect thumbprint shape?
Use your thumb or the back of a rounded measuring spoon for smooth wells. If the dough cracks a little, gently press the edges back together before baking for a picture-perfect finish.
Final Thoughts
There you have it—a festive, heartwarming cookie that never fails to charm. Eggnog Snickerdoodle Thumbprint Cookies bring together the best holiday flavors in a single, joyful bite. Whip up a batch for your next gathering and watch them disappear in a flurry of crumbs and smiles!
Print
Eggnog Snickerdoodle Thumbprint Cookies Recipe
- Prep Time: 20 minutes
- Cook Time: 12 minutes
- Total Time: 32 minutes
- Yield: 24 cookies
- Category: Dessert
- Method: Baking
- Cuisine: American
- Diet: Vegetarian
Description
These Eggnog Snickerdoodle Thumbprint Cookies are a delightful holiday treat that combines the flavors of eggnog and cinnamon in a soft, chewy cookie filled with a creamy eggnog center.
Ingredients
Cookies:
- 1 cup unsalted butter, softened
- 1 cup granulated sugar
- 1 large egg
- 1 teaspoon vanilla extract
- 1/2 teaspoon rum extract
- 2 1/4 cups all-purpose flour
- 1/2 teaspoon baking soda
- 1/2 teaspoon cream of tartar
- 1/2 teaspoon ground nutmeg
- 1/4 teaspoon salt
- 1/4 cup granulated sugar (for rolling)
- 1 teaspoon ground cinnamon
- 1/2 teaspoon ground nutmeg (for rolling)
Eggnog Filling:
- 1/2 cup eggnog
- 1 tablespoon cornstarch
- 2 tablespoons powdered sugar
- optional nutmeg for dusting
Instructions
- Preheat the oven: Preheat the oven to 350°F (175°C) and line a baking sheet with parchment paper.
- Cream butter and sugar: In a large bowl, cream together the butter and 1 cup granulated sugar until light and fluffy.
- Add wet ingredients: Beat in the egg, vanilla extract, and rum extract until well combined.
- Combine dry ingredients: In a separate bowl, whisk together the flour, baking soda, cream of tartar, nutmeg, and salt.
- Combine wet and dry ingredients: Gradually add the dry ingredients to the wet mixture and mix until fully incorporated.
- Prepare cinnamon-sugar coating: In a small bowl, stir together 1/4 cup sugar, 1 teaspoon cinnamon, and 1/2 teaspoon nutmeg.
- Shape dough: Scoop 1-tablespoon portions of dough and roll into balls, then coat each ball in the cinnamon-sugar mixture.
- Create indentations: Place dough balls on the baking sheet and press an indentation into the center of each cookie.
- Bake: Bake for 10–12 minutes until edges are set but centers are soft.
- Make eggnog filling: Whisk eggnog and cornstarch in a saucepan over medium heat until thickened.
- Fill cookies: Cool cookies, then fill the indentations with the eggnog filling and dust with nutmeg.
- Serve: Let the cookies set before serving.
Notes
- For a stronger eggnog flavor, add a pinch of nutmeg to the filling or use spiced eggnog.
- The filling will thicken as it cools.
- Store cookies in an airtight container at room temperature for up to 3 days or refrigerate for longer shelf life.
Nutrition
- Serving Size: 1 cookie
- Calories: 135
- Sugar: 9g
- Sodium: 60mg
- Fat: 7g
- Saturated Fat: 4g
- Unsaturated Fat: 2g
- Trans Fat: 0g
- Carbohydrates: 17g
- Fiber: 0g
- Protein: 1g
- Cholesterol: 20mg

