
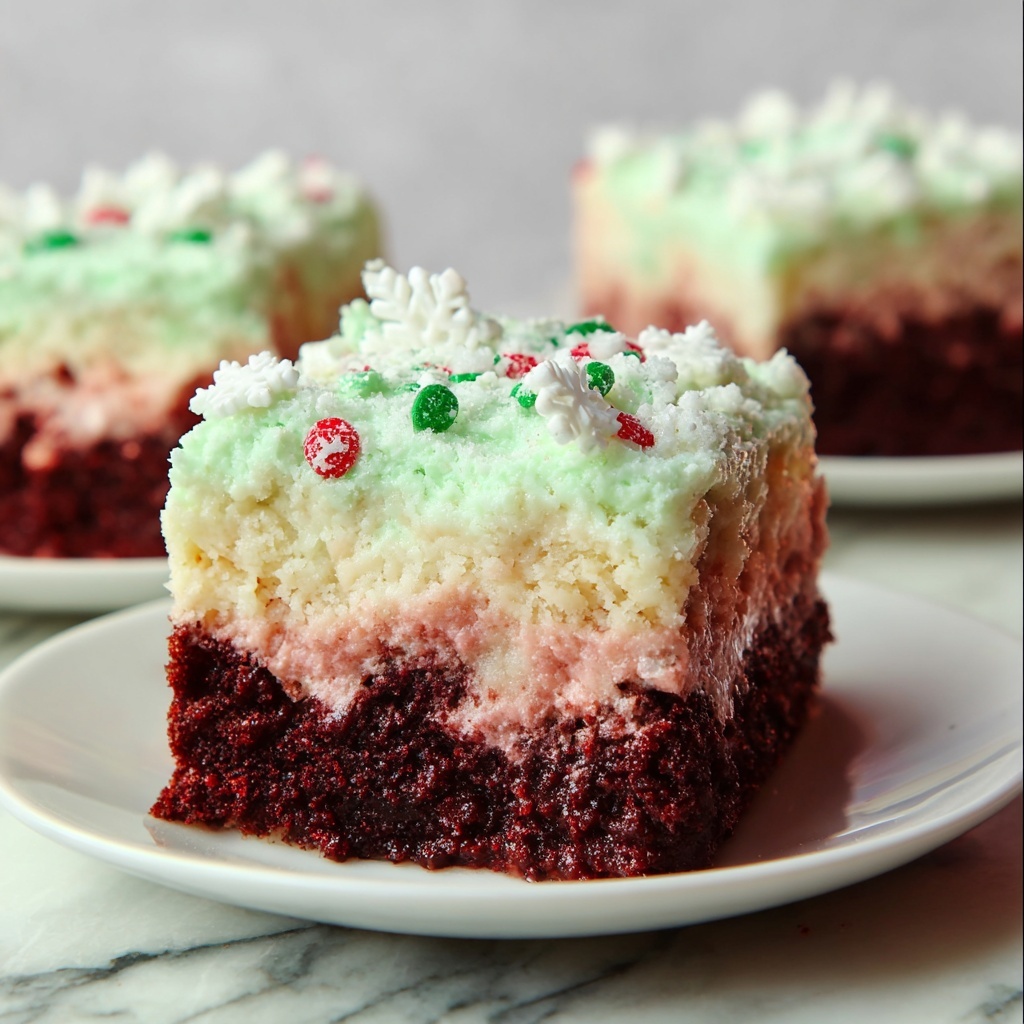
If you’re searching for a festive and utterly delightful dessert to wow your family and friends this holiday season, look no further than this Christmas Red Velvet Poke Cake Recipe. This show-stopping cake is a beautiful blend of classic red velvet flavor with luscious vanilla pudding soaked into every bite, topped with a dreamy layer of green-tinted whipped cream and festive sprinkles. Each forkful bursts with creamy, moist goodness that perfectly captures the joy of Christmas in one slice. Trust me, once you try this recipe, it will become your go-to holiday treat year after year!
Ingredients You’ll Need
Getting just the right balance of flavors and textures in this Christmas Red Velvet Poke Cake Recipe is surprisingly simple. The ingredients are straightforward but each plays a crucial role, from delivering that iconic red velvet richness to the creamy pudding filling and the silky, festive whipped topping.
- 1 box red velvet cake mix: This provides the rich, moist base and vibrant color essential for the holiday vibe.
- 2 3.4oz boxes Instant Vanilla Pudding Mix: Its creamy texture perfectly seeps into the cake’s pores for a luscious interior.
- 4 cups whole milk: Adds richness to the pudding, making sure it sets luxuriously.
- 2 cups heavy cream: Whipped into clouds of softness, this cream adds a smooth, airy finish atop the cake.
- 10 drops green food coloring: Gives the whipped cream that festive green hue, elevating the Christmas spirit.
- Red sugar sprinkles: Add sparkle and an extra pop of color that complements the red velvet base perfectly.
- Green sugar sprinkles: To enhance the Christmas palette and add a fun crunch.
- Snowflake sprinkles: Perfect festive accents that add whimsy to every slice.
- White chocolate shavings: They bring a delicate sweetness and lovely texture contrast on top.
How to Make Christmas Red Velvet Poke Cake Recipe
Step 1: Bake Your Red Velvet Cake
Start by preparing your red velvet cake mix exactly as the box instructs—the foundation of this dessert depends on a moist, flavorful cake. Once baked, allow it to cool slightly but not completely; this helps the pudding soak in better later on.
Step 2: Poke the Cake
Using the back of a wooden spoon, gently poke holes all over the surface of the warm cake. This step is crucial because it creates pockets for the pudding to seep into, infusing every bite with creamy goodness.
Step 3: Prepare the Pudding Mixture
While the cake is cooling, whisk together the instant vanilla pudding mix with 4 cups of whole milk until smooth and thickened. The pudding will be your secret weapon, transforming the cake into a luscious, moist wonder.
Step 4: Pour Pudding Over the Cake
Slowly pour the pudding mixture over the cake, making sure it fills every hole. Use a spatula to spread and gently press the pudding into those little pockets—you want this to soak in well!
Step 5: Chill to Set
Place the cake in the refrigerator and let it chill for a few hours. This resting period allows the pudding to fully set inside the cake, making it irresistibly creamy and flavorful.
Step 6: Prepare the Festive Whipped Cream
Beat the heavy cream until soft peaks form—this is your light, fluffy crown for the cake. Then add 10 drops of green food coloring and gently fold it in to achieve a lovely, festive green without deflating your whipped cream.
Step 7: Decorate and Finish
Spread the green whipped cream evenly over the chilled cake. Finally, sprinkle liberally with red and green sugar, snowflake sprinkles, and white chocolate shavings to create a breathtaking holiday masterpiece.
Step 8: Serve and Enjoy
Serve immediately for that fresh whipped cream texture, or keep refrigerated until you’re ready to dazzle your guests. This Christmas Red Velvet Poke Cake Recipe is sure to be the star of any holiday gathering.
How to Serve Christmas Red Velvet Poke Cake Recipe

Garnishes
While the sprinkles and white chocolate shavings are perfect on their own, feel free to add fresh raspberries or a dusting of powdered sugar for an extra elegant touch. Mint leaves also pair beautifully, enhancing the green holiday theme.
Side Dishes
This cake holds its own wonderfully but pairs especially well with light, refreshing options like a crisp peppermint salad or spiced hot chocolate. These sides balance the indulgence and keep the holiday cheer flowing.
Creative Ways to Present
Try serving individual portions in clear glasses to showcase the striking layers, or layer the poke cake trifle-style with extra pudding and whipped cream between cake cubes for a fun twist. Holiday-themed cake stands or platters add that extra sparkle to your dessert table.
Make Ahead and Storage
Storing Leftovers
Leftover Christmas Red Velvet Poke Cake Recipe keeps beautifully covered in the refrigerator for up to 4 days. The pudding and whipped cream keep the cake moist and fresh, so you won’t have to worry about it drying out.
Freezing
If you want to make this ahead of time, wrap the entire cake tightly in plastic wrap and then foil before freezing. It freezes best before adding the whipped cream topping. Thaw overnight in the fridge and add fresh whipped cream just before serving for best results.
Reheating
This cake is best enjoyed chilled, so reheating is not recommended. If you prefer a slightly softer texture, remove it from the fridge about 30 minutes before serving to take the chill off while keeping it perfectly moist and creamy.
FAQs
Can I make the pudding from scratch instead of using instant pudding mix?
Absolutely! You can prepare homemade vanilla pudding if you prefer, though instant pudding is a time-saving shortcut that works perfectly in this poke cake recipe without sacrificing flavor or texture.
What if I don’t have green food coloring?
You can easily skip the green coloring or substitute it with natural alternatives like matcha powder for a subtle green hue and added flavor, or simply leave the whipped cream white and focus on colorful sprinkles for festive charm.
Can this recipe be made gluten-free?
Yes, just select a gluten-free red velvet cake mix and ensure your pudding mix is gluten-free as well. The rest of the ingredients are naturally gluten-free, making it a fun holiday treat for those with gluten sensitivities.
Is there a dairy-free version of this poke cake?
For a dairy-free version, use nondairy milk like almond or oat milk with a dairy-free pudding mix, and substitute the heavy cream with a coconut cream that whips well. The cake mix would also need to be dairy-free, so check your labels carefully.
Can I use homemade red velvet cake instead of the boxed mix?
Definitely! Homemade red velvet cake will make this poke cake even more special and flavorful. Just be sure your cake is sturdy enough to hold the pudding without becoming too soggy and be mindful to poke holes evenly for the pudding to soak through.
Final Thoughts
There’s something truly magical about this Christmas Red Velvet Poke Cake Recipe that turns any holiday gathering into a memorable moment. With its glorious layers of rich red velvet, creamy vanilla pudding, and festive green whipped cream, it’s a dessert that dazzles both eyes and taste buds. I hope you give this recipe a try—it’s a beautiful way to spread holiday cheer one delicious slice at a time!
Print
Christmas Red Velvet Poke Cake Recipe
- Prep Time: 30 minutes
- Cook Time: 33 minutes
- Total Time: 3 hours 3 minutes (including chilling time)
- Yield: 18 servings
- Category: Dessert
- Method: Baking
- Cuisine: American
Description
Celebrate the holidays with this festive Christmas Red Velvet Poke Cake, featuring a moist red velvet base infused with creamy vanilla pudding, topped with lightly colored green whipped cream and decorative sprinkles for a delightful and visually stunning dessert perfect for any Christmas gathering.
Ingredients
Cake
- 1 box red velvet cake mix
Pudding Filling
- 2 (3.4 oz) boxes Instant Vanilla Pudding Mix
- 4 cups whole milk
Topping
- 2 cups heavy cream
- 10 drops green food coloring
- red sugar sprinkles
- green sugar sprinkles
- snowflake sprinkles
- white chocolate shavings
Instructions
- Prepare the Cake: Follow the instructions on the red velvet cake mix box to prepare and bake the cake as directed. Allow it to cool slightly.
- Poke the Cake: Using the back of a wooden spoon, poke holes evenly all over the warm cake to allow the pudding to seep in thoroughly.
- Mix the Pudding: Whisk together the instant vanilla pudding mix with the whole milk until smooth and well combined.
- Pour Pudding Over Cake: Pour the prepared pudding evenly over the cake, using a spatula to smooth it into the poked holes for maximum flavor infusion.
- Chill: Refrigerate the cake for several hours or until the pudding has set firmly inside the holes.
- Whip the Cream: Beat the heavy cream until soft peaks form, indicating it’s fluffy but not over-beaten.
- Add Color: Gently fold in 10 drops of green food coloring into the whipped cream until evenly tinted.
- Top the Cake: Spread the green whipped cream evenly over the chilled cake surface, then garnish liberally with red sugar sprinkles, green sugar sprinkles, snowflake sprinkles, and white chocolate shavings for a festive look.
- Serve: Either serve immediately or keep refrigerated until ready to enjoy. This cake is best eaten chilled.
Notes
- Ensure the cake is slightly warm when poking holes so pudding can penetrate easily.
- Use whole milk for the pudding to achieve the creamiest texture.
- Whip the cream just until soft peaks form to avoid turning it into butter.
- The green food coloring can be adjusted lightly to get your preferred festive shade.
- Keep the cake refrigerated if not serving right away to maintain freshness.


