
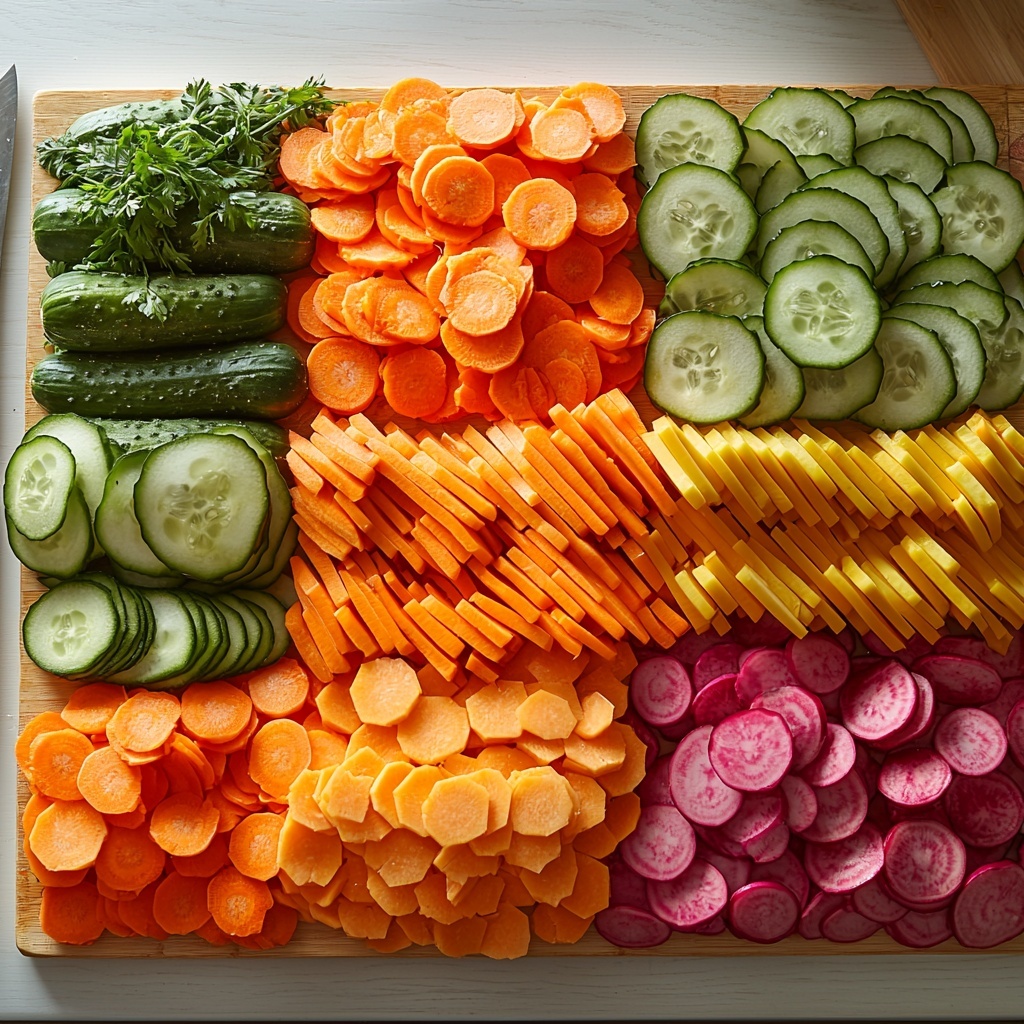
Learning How to Cut Julienne Strips Recipe is a fantastic skill that instantly elevates your kitchen game. This French technique transforms ordinary vegetables like carrots, cucumbers, or beets into elegant, thin matchstick-like strips that cook evenly and look beautiful in any dish. Whether you’re aiming for a stunning salad, a vibrant stir-fry, or a fancy garnish, mastering julienne will open up a world of creative possibilities in your cooking.
Ingredients You’ll Need
Getting started with julienne strips is refreshingly simple. The ingredients are minimalist but essential, each bringing its own texture, flavor, and color to your final dish. Choosing the right vegetable sets the foundation for your technique.
- Vegetable of your choice: Whether it’s a carrot, cucumber, beet, or squash, select fresh and firm vegetables for clean, crisp strips.
How to Make How to Cut Julienne Strips Recipe
Step 1: Prep Your Vegetables
Begin by peeling your vegetable to remove any tough outer skin. For carrots or beets, use a vegetable peeler to get rid of the outer layer, revealing the vibrant interior that’s perfect for julienning.
Step 2: Cut into 2 to 3 Inch Pieces
Trim any root or stem ends, then slice your vegetable into 2- to 3-inch sections. These manageable pieces make the cutting process safer and more consistent.
Step 3: Trim for Stability
Place each piece cut-side down on your board. To create a flat, stable base, trim a thin slice off the rounded side. This tiny step provides control and precision with each cut.
Step 4: Slice into Thin Planks
With the vegetable flat-side down, slice it lengthwise into thin planks about 1/16 to ⅛ inch thick. The thinner your planks, the more refined your julienne strips will be.
Step 5: Cut Planks into Strips
Stack a few planks and then carefully slice them lengthwise into the same thin strips, roughly matchstick width. Don’t forget to cut the initial trimmed piece into strips too — no waste here!
Step 6: Alternative Method: Cut at a Bias
For an elegant variation, try slicing your vegetable at a sharp diagonal angle, or bias, about 2 to 3 inches long. Then, make cuts roughly 1/16 to ⅛ inch apart to get thin, elongated pieces.
Step 7: Cut Bias Slices into Strips
Stack these diagonal slices and cut again along their length into thin strips. This creates a slightly different texture and shape that adds visual interest to your dishes.
How to Serve How to Cut Julienne Strips Recipe
Garnishes
Julienne strips are perfect garnishes for salads, soups, and even main dishes. Their delicate shape adds a touch of elegance and crunch. Sprinkle a few on top of a bowl for an instant pop of color and texture.
Side Dishes
Use your julienne strips to make quick stir-fried vegetables or a refreshing slaw. Because these strips cook quickly and evenly, they’re perfect for vibrant, fast side dishes that complement any meal.
Creative Ways to Present
Try layering julienne strips in a clear glass for colorful layered salads, or wrap them into delicate veggie rolls. They also pair wonderfully with dipping sauces as crunchy, healthy snacks. The possibilities are endless, and each presentation brings out their beautiful shape.
Make Ahead and Storage
Storing Leftovers
If you have leftover julienne strips, store them in an airtight container lined with a damp paper towel. This helps keep the strips crisp for up to two days in the fridge.
Freezing
Because julienne strips are thin and delicate, freezing isn’t ideal—they can become limp and lose texture. It’s best to enjoy them fresh for maximum crunch and flavor.
Reheating
For reheating, a quick sauté in a hot pan helps revive the crispness of julienne vegetables. Avoid microwaving as it can turn the strips mushy quickly.
FAQs
What vegetables are best for julienne cuts?
Firm, cylindrical vegetables like carrots, cucumbers, beets, and squash work best because they hold their shape well and slice evenly into thin strips.
How thin should julienne strips be?
Julienne strips are typically between 1/16 and 1/8 of an inch thick, ensuring they cook quickly and look elegant without being too fragile.
Can I use a mandoline for julienning?
Yes, a mandoline can speed up the process and ensure uniform strips, but be cautious and always use a safety guard to protect your fingers.
How long does it take to learn How to Cut Julienne Strips Recipe?
With a bit of practice, you can master julienne cuts in just a few minutes. It’s a straightforward technique that becomes second nature over time.
Are julienne strips only for garnishing?
Not at all! While they make beautiful garnishes, julienne strips are great in salads, stir-fries, soups, and even as raw snacks.
Final Thoughts
Once you get the hang of How to Cut Julienne Strips Recipe, you’ll find endless ways to incorporate this stylish cut into your cooking. It’s such a simple technique that brings a touch of sophistication and a lot of fun to preparing vegetables. So grab your favorite veggie and start slicing — I promise you’ll love the difference it makes!
Print
How to Cut Julienne Strips Recipe
- Prep Time: 2 minutes
- Cook Time: 0 minutes
- Total Time: 2 minutes
- Yield: 1 serving
- Category: Knife Skills
- Method: No-Cook
- Cuisine: Universal
Description
Learn how to cut vegetables into julienne strips using two effective methods. This guide shows you how to peel, trim, and slice vegetables like carrots, cucumbers, beets, and squash into thin, matchstick-sized strips perfect for salads, stir-fries, and garnishes.
Ingredients
Ingredients
- 1 vegetable (carrot, cucumber, beet, squash, or similar)
Instructions
- Peel Veggies: If you are preparing a carrot or beet, start by peeling the outer layer using a vegetable peeler to remove the tough skin.
- Cut into 3-inch Pieces: Slice the vegetable into 2 to 3-inch pieces, discarding any root or stem ends to get manageable segments.
- Trim off Edge: Place each piece cut-side down on a cutting board and trim a thin slice off the rounded side to create a flat, stable base for safer slicing.
- Cut into Planks: Lay the piece flat-side down and slice it into thin 1/16- to 1/8-inch thick planks. Stack a few of these planks and cut them into matching 1/16- to 1/8-inch julienne strips. Don’t forget to cut the trimmed edge into strips as well.
- Alternative Method – Cut at a Bias: For cylindrically shaped vegetables, cut diagonal slices (bias) about 2 to 3 inches long and 1/16- to 1/8-inch apart starting from the root or stem end.
- Cut into Strips: Stack several bias-cut pieces and slice down through the stack at 1/16- to 1/8-inch intervals to create the julienne strips.
Notes
- Use a sharp knife for clean, even cuts and safer handling.
- Julienne strips are typically 1/16- to 1/8-inch thick and about 2 to 3 inches long.
- The trimmed edge is often discarded but can also be cut into strips to minimize waste.
- This technique works well for any firm vegetable with a cylindrical or block shape.


