
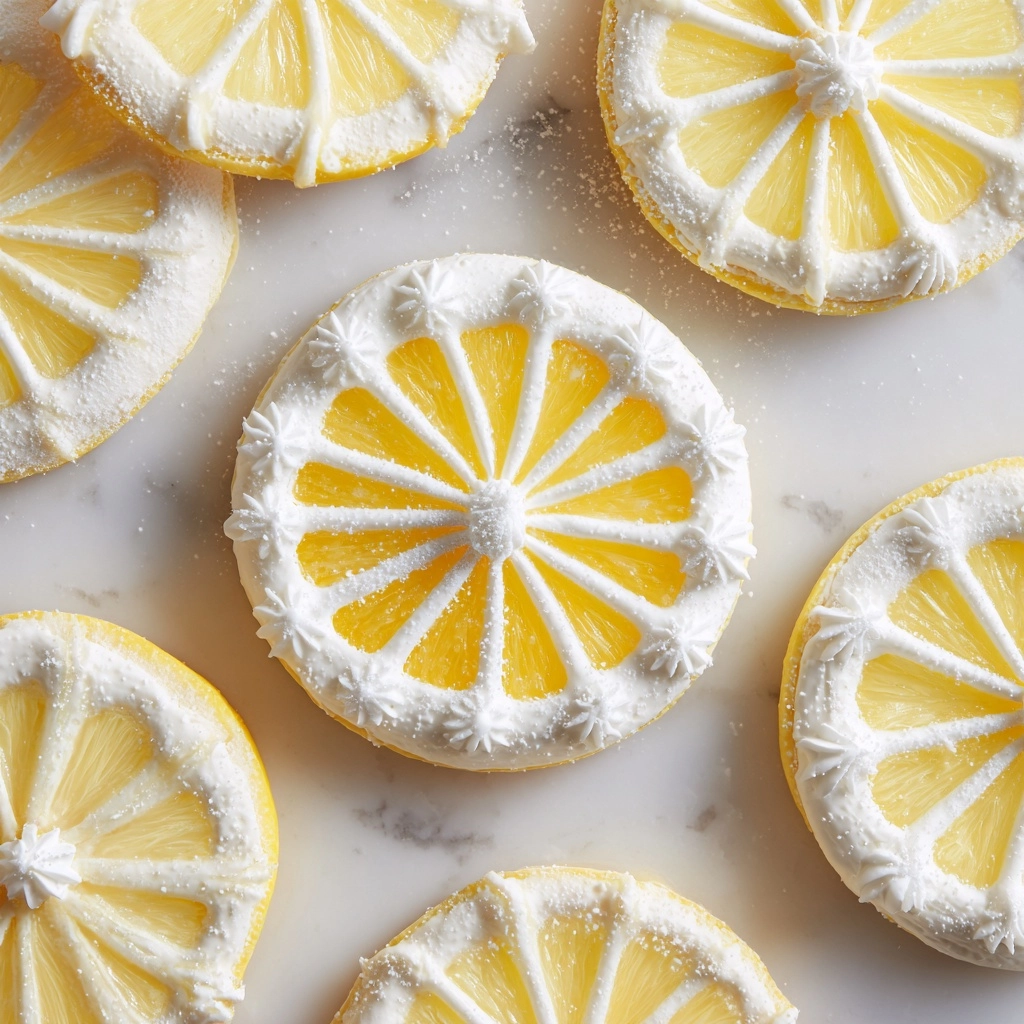
Bright, zesty, and dusted with a magical flurry of powdered sugar, Lemon Snowflakes are the citrusy cookies your dessert tray deserves. With a soft, cake-like bite and a flavor that bursts like the first warm day of spring, these cookies transform humble cake mix into a crowd-pleasing treat—perfect for bake sales, sunny afternoon snacks, or just when you need to lift your spirits with something sweet and simple. If you adore lemon desserts, this playful recipe is destined to become a new favorite in your baking repertoire.
Ingredients You’ll Need
There’s something wonderful about how a short ingredient list can deliver pure cookie bliss! Each component in Lemon Snowflakes works in harmony, delivering tangy flavor, pillowy texture, and that signature snowy finish—no fancy tools or hard-to-find items required.
- 1 box lemon cake mix: The backbone of the recipe, providing all the sunny lemon flavor and a perfectly tender crumb.
- 2 large eggs: These help bind the dough and give the cookies their soft, chewy center.
- 1/3 cup vegetable oil: For moisture and richness, ensuring every bite is melt-in-your-mouth soft.
- 1 teaspoon lemon zest: Adds fresh, natural lemon aroma and an extra pop of citrus—don’t skip it!
- 1/2 teaspoon vanilla extract: Balances out the lemon with a subtle warmth; lemon extract can be used for extra zing.
- 1/2 cup powdered sugar (for rolling): The “snow” that gives Lemon Snowflakes their signature look and a sweet, crackled finish.
How to Make Lemon Snowflakes
Step 1: Prep Your Baking Sheet and Oven
Begin by preheating your oven to 350°F (175°C). Line a baking sheet with parchment paper to ensure your cookies don’t stick and clean-up is a breeze. This step is often overlooked but really helps create perfect Lemon Snowflakes, every time!
Step 2: Mix Up That Magical Dough
Grab a large mixing bowl and combine the lemon cake mix, eggs, vegetable oil, lemon zest, and vanilla extract. Stir everything together—no need for a mixer—a good old-fashioned spoon will do. You’ll get a thick, soft dough that already smells heavenly.
Step 3: Shape and Sugar Coat
Scoop out tablespoon-sized portions of dough and roll them into little balls. Now, here’s where the “snowfall” magic happens: Roll each ball generously in powdered sugar until every bit is well-coated. This creates the crackled, snowy look and adds just the right touch of sweetness.
Step 4: Bake to Perfection
Place the powdered sugar–coated dough balls on your prepared baking sheet, leaving about 2 inches between each—these beauties need room to spread and crackle. Bake for 8 to 10 minutes, just until the tops are set and charmingly crinkled but still soft in the center.
Step 5: Cool and Enjoy
Let the cookies cool on the baking sheet for 2 minutes before transferring them to a wire rack. The brief waiting period helps Lemon Snowflakes set up and ensures they stay tender (but not fragile). Once cooled, get ready for the first magical bite!
How to Serve Lemon Snowflakes

Garnishes
A little extra dusting of powdered sugar right before serving gives Lemon Snowflakes a truly irresistible look. For a splash of color (and a fun twist), add a few curls of lemon zest on top or place the cookies on a bright serving platter. These small touches make the cookies look as sunny as they taste!
Side Dishes
Lemon Snowflakes pair beautifully with a cold glass of milk, a cup of herbal tea, or a tangy lemonade for an all-out citrus extravaganza. You could also serve them alongside a bowl of fresh berries or a citrus fruit salad to really embrace the lemon theme.
Creative Ways to Present
Turn Lemon Snowflakes into a stunning DIY gift by stacking a dozen in a clear cellophane bag tied with a yellow ribbon. For parties, arrange them in a snowflake shape on a big round platter or tuck a single cookie into lunchboxes as a cheerful surprise. Want to elevate your cookie tray? Alternate Lemon Snowflakes with chocolate or berry cookies for vibrant color contrast.
Make Ahead and Storage
Storing Leftovers
Once cooled completely, Lemon Snowflakes keep best in an airtight container at room temperature. They’ll stay soft and delicious for up to five days—if they last that long! For ultimate freshness, place a sheet of parchment between cookie layers to prevent sticking.
Freezing
Got extras or planning ahead? Lemon Snowflakes freeze fantastically! Seal fully cooled cookies in a freezer-safe container with parchment between layers. They’ll keep their delightful flavor and texture for up to two months. Just thaw at room temperature before serving.
Reheating
These cookies are fabulous at room temperature, but if you love a warm, bakery-fresh treat, pop a few Lemon Snowflakes in a 300°F oven for about 2 to 3 minutes. Alternatively, a few seconds in the microwave softens them up—just be sure to enjoy them promptly for the perfect texture.
FAQs
Can I use a different flavor of cake mix instead of lemon?
Absolutely! While the lemon cake mix is what gives Lemon Snowflakes their sunny, signature flavor, you can experiment with strawberry, vanilla, or even orange cake mix for a tasty twist on the original recipe.
How do I make the cookies more lemony?
For a punchier citrus flavor, add a tablespoon of fresh lemon juice, a few drops of lemon extract, or extra zest to the dough. The tang will take your Lemon Snowflakes up another notch!
Can I make the dough ahead of time?
Definitely. You can prepare the dough a day ahead, cover it tightly, and refrigerate. When ready to bake, let it sit at room temperature for 20–30 minutes to soften slightly, then proceed with rolling in powdered sugar and baking.
Why did my cookies spread too much?
If your Lemon Snowflakes spread too much, it could be due to warm dough or a hot baking sheet. Try chilling the dough balls for 10–15 minutes before rolling in sugar and baking, and always use a cool, lined tray for new batches.
Are these cookies gluten free?
Traditional Lemon Snowflakes use regular cake mix and are not gluten free, but you can swap in a gluten-free lemon cake mix with great results. Always check ingredient labels if you’re baking for those with allergies.
Final Thoughts
If you’re searching for a cookie that brings sparkle to any occasion, you can’t go wrong with Lemon Snowflakes. They’re impossibly easy, delightfully bright, and a guaranteed way to bring out smiles. Grab a box of cake mix, a lemon or two, and whip up a batch—you’ll see just how quickly they disappear!
Print
Lemon Snowflakes Recipe
- Prep Time: 10 minutes
- Cook Time: 10 minutes
- Total Time: 20 minutes
- Yield: 24 cookies
- Category: Dessert
- Method: Baking
- Cuisine: American
- Diet: Vegetarian
Description
These Lemon Snowflakes are delightful citrus-infused cookies made with a lemon cake mix, creating a soft and zesty treat perfect for any occasion. Coated in powdered sugar, these cookies are a sweet and tangy delight.
Ingredients
Dry Ingredients:
- 1 box lemon cake mix
Wet Ingredients:
- 2 large eggs
- 1/3 cup vegetable oil
- 1 teaspoon lemon zest
- 1/2 teaspoon vanilla extract
- 1/2 cup powdered sugar (for rolling)
Instructions
- Preheat and Prepare: Preheat the oven to 350°F (175°C) and line a baking sheet with parchment paper.
- Mix Ingredients: In a large bowl, combine lemon cake mix, eggs, vegetable oil, lemon zest, and vanilla extract to form a soft dough.
- Roll Dough: Scoop out tablespoon-sized portions of dough and roll into balls.
- Coat in Sugar: Roll each ball in powdered sugar until well coated.
- Bake: Place on baking sheet, bake for 8–10 minutes until set and crackled.
- Cool: Allow to cool on the sheet for 2 minutes, then transfer to a wire rack to cool completely.
Notes
- For extra lemon flavor, consider adding 1 tablespoon of fresh lemon juice or using lemon extract.
- Store cookies in an airtight container at room temperature for up to 5 days.
Nutrition
- Serving Size: 1 cookie
- Calories: 95
- Sugar: 8g
- Sodium: 95mg
- Fat: 4g
- Saturated Fat: 1g
- Unsaturated Fat: 3g
- Trans Fat: 0g
- Carbohydrates: 13g
- Fiber: 0g
- Protein: 1g
- Cholesterol: 10mg


