
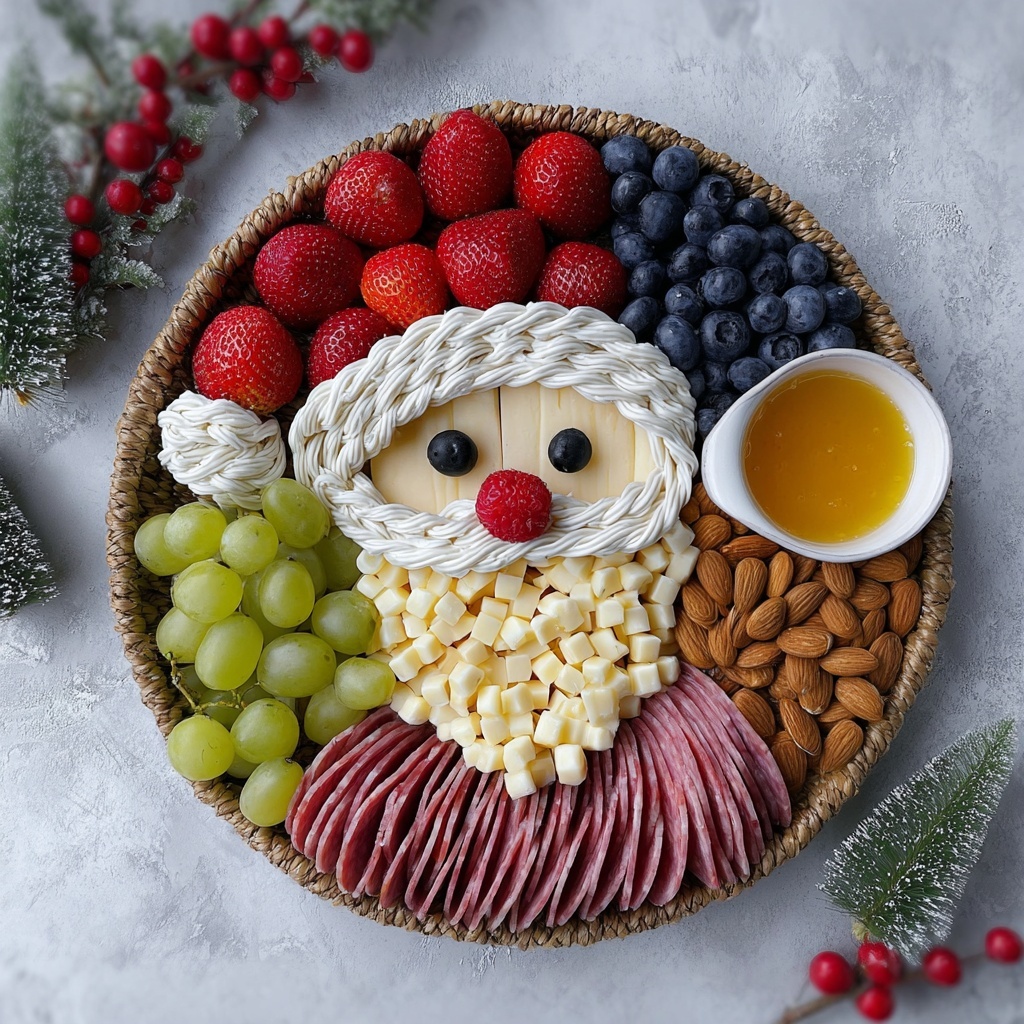
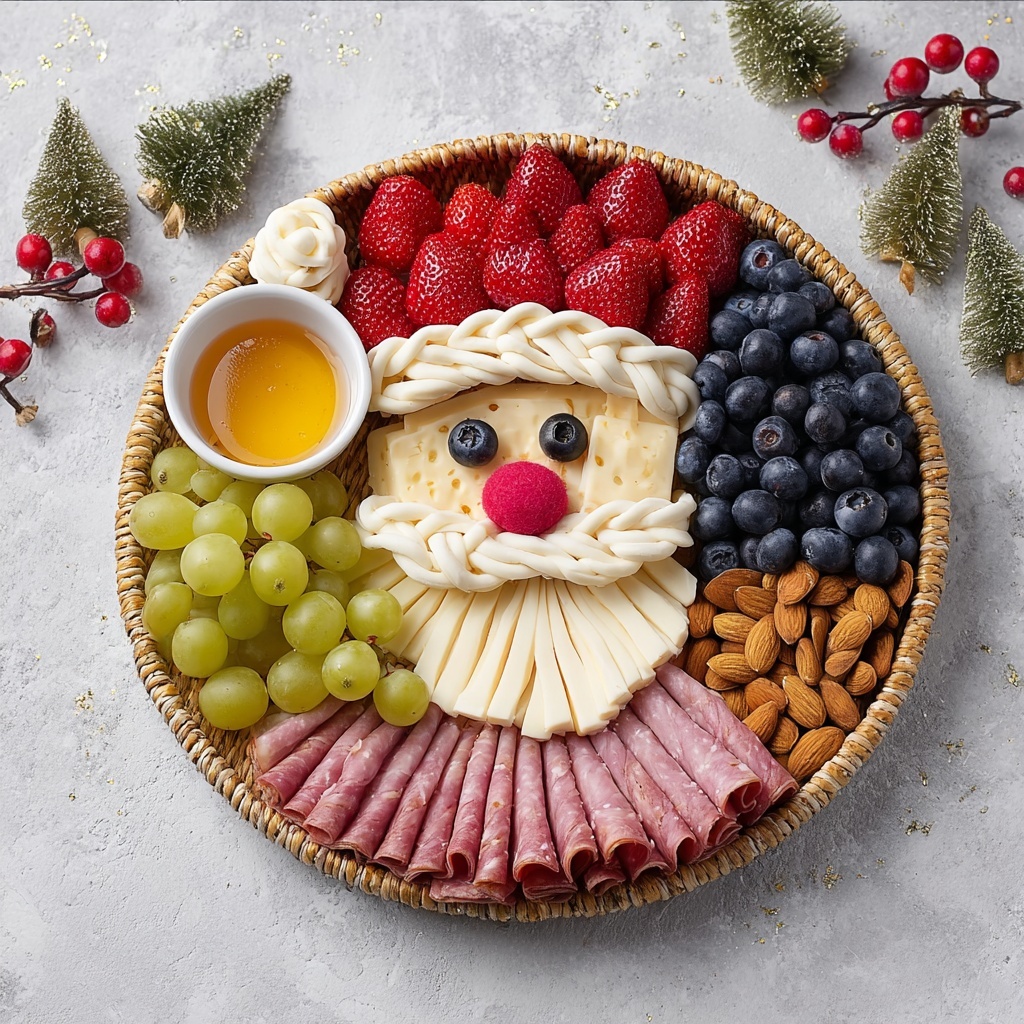
If you’re looking to add a dose of festive joy and tasty fun to your holiday gatherings, the Santa Charcuterie Board Recipe is an absolute showstopper. This playful take on a charcuterie board brings together a delightful mix of creamy cheeses, fresh fruit, savory nuts, and meats arranged with a creative nod to Santa Claus himself. Not only is it visually charming, but every bite delivers a wonderful balance of textures and flavors that will have everyone smiling before the first nibble. Whether you’re hosting a Christmas party or just want a cheerful snack, this recipe makes entertaining both easy and utterly delightful.
Ingredients You’ll Need
These ingredients are simple yet perfectly chosen to create an attractive and tasty Santa-themed board. Each one plays a crucial role in flavor, texture, and color to bring the festive spirit alive on your platter.
- Round slice from a whole wheel of cheese: Provides the base for Santa’s face, creamy and sturdy for decoration.
- Braided string cheese: Perfect for mimicking Santa’s lively hair with its tender texture.
- Mozzarella balls: Soft and milky, these form the fluffy beard that’s irresistible to snack on.
- Cherry tomato: Adds bright red color and juicy sweetness, perfect for Santa’s nose.
- Strawberries: Their vibrant red slices become Santa’s festive hat, adding fresh fruitiness.
- Blueberries: Scattered for a pop of blue that complements the holiday theme and adds burst of tartness.
- Grapes: Juicy and sweet, filling in space with a refreshing touch.
- Olives: Provide a salty bite and also double as Santa’s eyes.
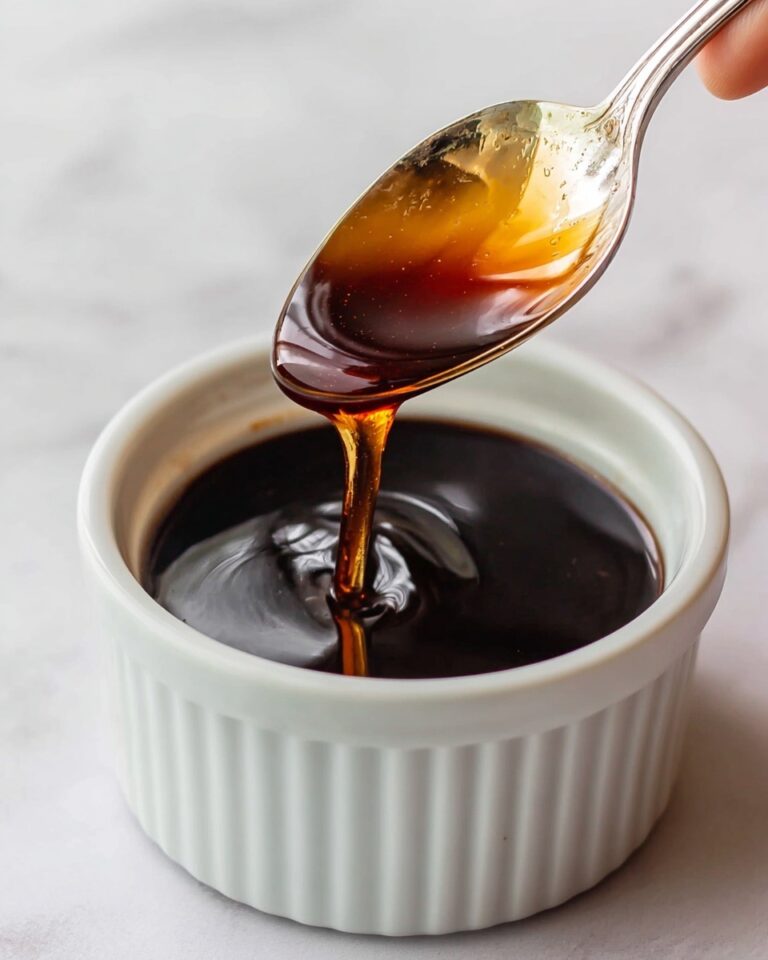
- Honey: Sweet and smooth, perfect for drizzling or dipping alongside savory bites.
- Ham slices: Rolled artistically into roses and layered for savory depth and visual charm.
- Pistachios: Add crunch and a hint of earthiness with their green hues enhancing the festive look.
- Almonds: A nutty crunch that complements both the fruit and meats beautifully.
How to Make Santa Charcuterie Board Recipe
Step 1: Gather Your Festive Ingredients
Start by collecting all your essential ingredients to have them ready and fresh. This preparation is key to assembling your Santa face smoothly and ensures a stress-free setup.
Step 2: Shape Santa’s Face
Take the round slice of cheese and carefully cut a small portion from the bottom to create the shape of Santa’s face. This semi-circle will act as your canvas to build this festive snack piece by piece.
Step 3: Add Santa’s Hair and Beard
Place the semi-circle cheese in the center of your board. Arrange the braided string cheese around the top and sides to form Santa’s hair, giving texture and volume. Use the mozzarella balls along the bottom edge to create a soft, fluffy beard that’s inviting to eat.
Step 4: Craft Santa’s Facial Features
Create Santa’s eyes by halving olives and placing them thoughtfully on the cheese face. Nestle a sliced cherry tomato in the middle to form a bright red nose that pops with juicy flavor.
Step 5: Build Santa’s Hat
Slice strawberries lengthwise and arrange these vibrant pieces above Santa’s hair to resemble his iconic red hat. Top the hat with a small circle of cheese as the pom-pom, adding a delicate finishing touch. Position the honey near Santa’s face to allow for dipping and drizzling.
Step 6: Fill in the Festive Background
Scatter blueberries, grapes, and olives around the upper half of the board to mimic a wintery color palette while balancing flavors between sweet and savory. This gives a luscious backdrop for the main Santa feature.
Step 7: Add Final Touches with Ham and Nuts
Roll ham slices into little rose shapes and place one prominently next to Santa’s face to add a charming detail. Fill in the remaining space on the board with the rest of the ham slices, pistachios, and almonds for satisfying crunch and savory notes that round out the board beautifully.
How to Serve Santa Charcuterie Board Recipe
Garnishes
Consider adding a few sprigs of fresh rosemary or some edible flowers around the edges for an elegant herbal fragrance and a splash of greenery that lifts the overall presentation. These garnishes also enhance the festive look without overpowering the flavors.
Side Dishes
This charcuterie board shines as a centerpiece but pairs wonderfully with crusty artisan bread or crackers to provide a crunchy base for the creamy cheeses and savory meats. A light salad with citrus vinaigrette can also add a fresh contrast to the indulgence of the board.
Creative Ways to Present
Use a rustic wooden board or a festive platter to showcase your creation — both add charm. Arrange the ingredients thoughtfully so that every detail of Santa’s face is visible and inviting, and consider personalizing with small handwritten tag labels for each item to spark conversation.
Make Ahead and Storage
Storing Leftovers
If you have any leftovers, cover your board tightly with plastic wrap or transfer contents to airtight containers. Refrigerate promptly to maintain freshness, especially for the cheeses and meats, which tend to lose flavor and texture if left out too long.
Freezing
Since this board features fresh fruits and delicate cheeses, freezing is not recommended as it will change the texture and flavor. It’s best to prepare just before serving to enjoy the freshest experience.
Reheating
Reheating is unnecessary and not advised for this recipe. The beauty of the Santa Charcuterie Board Recipe lies in its fresh and cold elements, which make it a crisp and appealing snack perfect right from the refrigerator.
FAQs
Can I substitute any of the cheeses in the Santa Charcuterie Board Recipe?
Absolutely! You can swap mozzarella balls for mini bocconcini or try a soft goat cheese for a tangier twist. Just keep a similar size and texture to maintain the design and mouthfeel.
Are there vegetarian options to replace the ham slices?
Yes, roasted red pepper strips or marinated artichoke hearts can be great vegetarian alternatives that add both flavor and beautiful color to your board.
How far in advance can I prepare the Santa Charcuterie Board Recipe?
It’s best to assemble the board within a couple of hours before serving to ensure freshness, especially for the fruit and cheeses, which can dry out or discolor if left exposed too long.
What kind of honey works best with this board?
Choose a mild, floral honey like clover or orange blossom for a subtle sweetness that complements rather than overpowers the savory elements on the board.
Can I make this board gluten-free?
Definitely! This recipe is naturally gluten-free as it focuses on fruits, nuts, cheese, and meats. Just avoid adding crackers or breads with gluten, or replace them with gluten-free versions.
Final Thoughts
This Santa Charcuterie Board Recipe is a joyful way to bring everyone together around a table filled with festive cheer and delicious bites. It’s so much more than a snack — it’s a conversation starter, a crowd-pleaser, and a holiday highlight all in one. I can’t wait for you to try making it yourself and watch your friends and family light up at the sight of this edible Santa. Happy holidays and happy snacking!
Print
Santa Charcuterie Board Recipe
- Prep Time: 30 minutes
- Cook Time: 0 minutes
- Total Time: 30 minutes
- Yield: 1 charcuterie board serving about 6-8 people
- Category: Appetizer
- Method: No-Cook
- Cuisine: American
- Diet: Low Fat
Description
Create a festive and visually stunning Santa Charcuterie Board perfect for holiday gatherings, featuring a delightful arrangement of cheeses, fruits, nuts, and meats shaped to resemble Santa Claus.
Ingredients
Cheeses
- 1 round slice from a whole wheel of cheese (about 6–8 inches diameter)
- 7 braided string cheese pieces
- 1 cup mozzarella balls
Fruits & Vegetables
- 1 cherry tomato
- 1 cup strawberries
- 1 cup blueberries
- 1 cup grapes
- 1 cup olives
Meats & Nuts
- 10 slices ham
- 1/4 cup pistachios
- 1/4 cup almonds
Condiments
- 1/4 cup honey
Instructions
- Gather Ingredients: Collect all the ingredients needed for the Santa Charcuterie Board so you have everything ready on hand.
- Shape Santa’s Face: Take the round cheese slice and cut off a small portion from the bottom to create a semi-circle shape representing Santa’s face.
- Arrange Hair and Beard: Place the cheese semi-circle in the center of your board. Use the braided string cheese pieces to form Santa’s hair around the top edges, and arrange the mozzarella balls below the semi-circle to mimic Santa’s beard.
- Create Eyes and Nose: Slice an olive in half and position them as Santa’s eyes on the cheese face. Cut the cherry tomato into a slice and place it in the center for the nose.
- Add Santa’s Hat: Slice the strawberries and arrange them on top of the cheese semi-circle to represent Santa’s hat. Place a small cheese circle at the tip of the hat as the pom-pom. Position the honey container beside Santa’s face as an accent.
- Fill Board with Fruits and Olives: Fill the upper half of the charcuterie board surrounding the Santa face with blueberries, grapes, and olives for a colorful and festive look.
- Decorate with Ham and Nuts: Roll the ham slices into rose shapes and place one near Santa’s face. Scatter the remaining ham slices, pistachios, and almonds artistically around the board to complete the arrangement.
Notes
- Use a large wooden or slate board as the base for easy arrangement.
- The cheese wheel size can vary but aim for about 6-8 inches diameter for a good-sized face.
- Gently roll ham slices to create rose shapes; use toothpicks if needed to secure.
- Substitute mozzarella balls with small bocconcini or fresh curd cheese if desired.
- Keep fruits fresh by lightly rinsing and drying before assembling.
- Perfect for holiday parties, kid-friendly gatherings, or festive appetizers.
