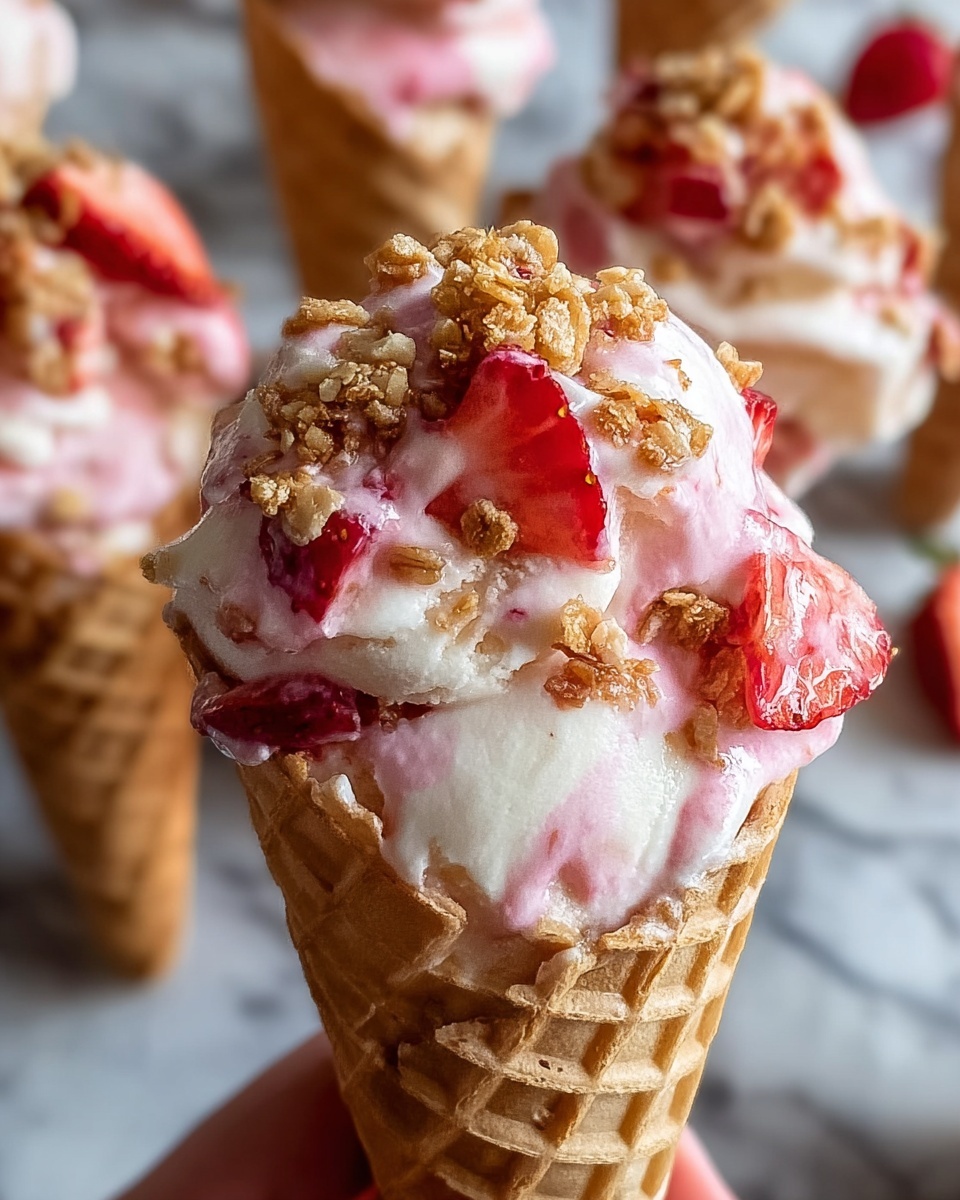
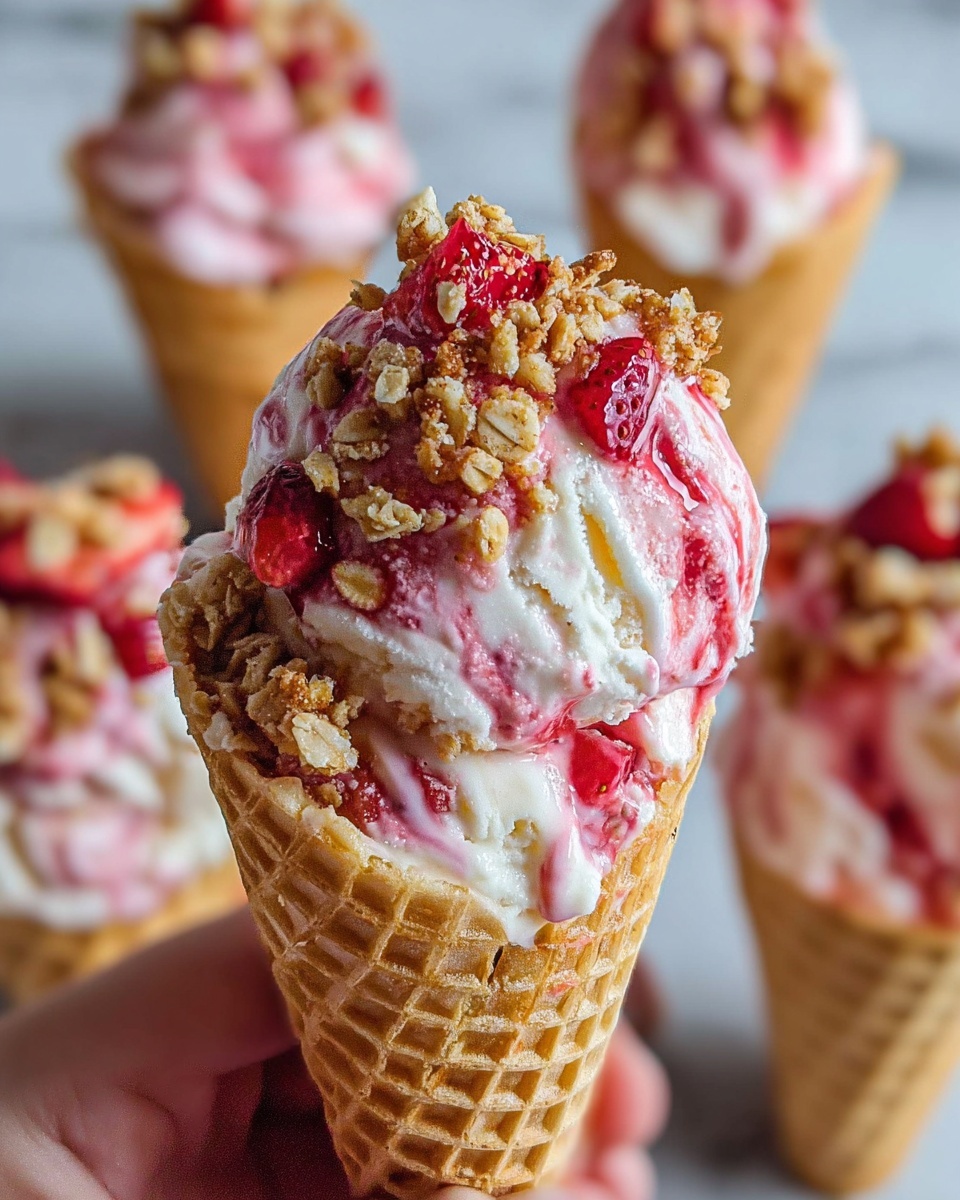
If you are on the hunt for a dessert that is both charming and irresistibly delicious, look no further than this Strawberry Crunch Cheesecake Cones Recipe. Imagine creamy, fluffy cheesecake filling mixed with a satisfying crunch, all lovingly nestled inside a crisp waffle cone and topped with fresh, juicy strawberries. This treat is perfect for impressing guests or indulging in a delightful snack that’s bursting with flavor and texture. Every bite combines the sweet tang of strawberries, a smooth cheesecake base, and a crunchy surprise that will have you reaching for seconds. Let me walk you through how easy and fun it is to whip up these delightful cones that are bound to become a favorite in your dessert rotation.
Ingredients You’ll Need
These ingredients are wonderfully simple yet essential for creating the perfect harmony of creamy, crunchy, and fresh flavors in your Strawberry Crunch Cheesecake Cones Recipe. Each one plays a special role, from the richness of the cream cheese to the crispness of the waffle cones.
- Cream cheese (8 oz, softened): This forms the rich, velvety base of your cheesecake filling, so make sure it’s softened for easy mixing.
- Powdered sugar (½ cup): Adds smooth, balanced sweetness without any graininess, perfect for cheesecake texture.
- Vanilla extract (1 teaspoon): Brings out the warmth and depth of the cheesecake flavor with a subtle aromatic note.
- Heavy cream (1 cup): Whipped to stiff peaks, this ingredient creates the light, airy texture that makes the filling feel like a dream.
- Fresh strawberries (1 cup, sliced): Adds natural sweetness and a vibrant pop of color that’s refreshing and juicy in every bite.
- Crunchy toppings (½ cup): Choose from crushed graham crackers, nuts, or cereal—these provide that satisfying crunch that sets this recipe apart.
- Waffle cones (6-8, sturdy and crispy): The perfect edible container that’s both a treat and part of the flavor experience.
How to Make Strawberry Crunch Cheesecake Cones Recipe
Step 1: Prepare the Cheesecake Filling
Start by beating the softened cream cheese in a large bowl until it’s smooth and creamy using an electric mixer. This helps ensure a silky texture that’s essential for your cheesecake cones. Gradually add in the powdered sugar and vanilla extract, mixing continuously until everything comes together into a luscious, evenly combined batter that’s a joy to work with.
Step 2: Whip the Heavy Cream
In a separate chilled bowl, whip the heavy cream until stiff peaks form. This step is crucial because the whipped cream adds an airy lightness and volume to your cheesecake filling, transforming it from dense to delightfully fluffy.
Step 3: Fold Whipped Cream Into Cheesecake Mixture
Gently fold the whipped cream into the cream cheese mixture using a spatula, taking care not to deflate the airy texture you just created. This careful folding ensures the filling remains creamy while gaining that perfect level of fluffiness that will make your Strawberry Crunch Cheesecake Cones Recipe so irresistible.
Step 4: Add Crunchy Toppings
Now it’s time for the fun textural contrast. Mix your chosen crunchy toppings—whether it’s crushed graham crackers, nuts, or cereal—into the filling. This step adds that signature crunch that gives each bite a sensational contrast, making your cones stand out with extra flavor and texture.
Step 5: Assemble the Cones
Finally, take your waffle cones and carefully fill each one with the cheesecake mixture. You can spoon it in or use a piping bag for a neat finish. Then, top each cone generously with sliced fresh strawberries and a sprinkle of extra crunchy topping. This not only adds to the flavor layers but also makes your Strawberry Crunch Cheesecake Cones Recipe visually stunning and ready to enjoy.
How to Serve Strawberry Crunch Cheesecake Cones Recipe

Garnishes
Enhance the look and taste of your cones with some fun garnishes like fresh mint leaves, a light dusting of powdered sugar, or even a drizzle of melted chocolate. These simple touches add extra flair and elevate the presentation to something special every time.
Side Dishes
Serve your Strawberry Crunch Cheesecake Cones alongside a chilled berry compote or a scoop of vanilla bean ice cream to complement the creamy and crunchy elements. Fresh fruit salads or a citrusy sorbet can also be refreshing companions that balance the richness of the cones.
Creative Ways to Present
Instead of standing your cones upright in a simple glass, try using a decorative cone holder or place them on a platter lined with edible flowers and strawberry slices for a stunning display. You can also serve the cheesecake filling in small cups topped with crushed cone pieces for a deconstructed twist on the classic recipe.
Make Ahead and Storage
Storing Leftovers
If you happen to have any leftovers from your Strawberry Crunch Cheesecake Cones Recipe, store the filling separately in an airtight container in the refrigerator for up to two days. Keep the waffle cones in their original packaging or an airtight container to maintain their crispness.
Freezing
The cheesecake filling can be frozen in a suitable container for up to one month. Just thaw it overnight in the fridge before gently re-whipping to restore the texture. However, it’s best to avoid freezing the cones themselves, as they can become soggy and lose their crunch.
Reheating
This dessert is best enjoyed chilled, so reheating isn’t necessary. Instead, simply let the filling soften slightly at room temperature for 10-15 minutes before filling the cones to keep that perfect creamy texture.
FAQs
Can I use frozen strawberries for the Strawberry Crunch Cheesecake Cones Recipe?
While fresh strawberries provide the best texture and flavor, you can use thawed frozen strawberries if needed. Just be sure to drain any excess liquid to prevent the cones from becoming soggy.
What are some good alternatives to waffle cones?
You can experiment with sugar cones or even mini tart shells to hold the cheesecake mixture if you prefer a different texture or shape. Just make sure they are sturdy enough to support the filling.
Can I prepare the filling a day ahead?
Absolutely! The filling can be made a day in advance and stored covered in the refrigerator. Just give it a gentle stir before assembling your cones to keep it smooth and airy.
How do I make the crunchy topping if I don’t have graham crackers?
Feel free to use chopped nuts like almonds or pecans, crushed cereal like cornflakes, or even toasted coconut flakes for a tasty, crunchy twist.
Is this recipe suitable for kids?
Yes, this Strawberry Crunch Cheesecake Cones Recipe is kid-friendly and a fun treat to make together. The sweet, creamy flavors and crunchy texture are usually a big hit with little ones.
Final Thoughts
Trying out the Strawberry Crunch Cheesecake Cones Recipe is a fantastic way to bring a joyful and tasty twist to your dessert table. With simple ingredients and straightforward steps, you get a show-stopping dessert that looks impressive and tastes even better. I encourage you to make these cones soon—whether for a special occasion or a weekend treat, they’ll brighten your day and delight everyone lucky enough to try them.
Print
Strawberry Crunch Cheesecake Cones Recipe
- Prep Time: 20 minutes
- Cook Time: 0 minutes
- Total Time: 20 minutes
- Yield: 6 servings
- Category: Dessert
- Method: No-Cook
- Cuisine: American
- Diet: Vegetarian
Description
These Strawberry Crunch Cheesecake Cones are a delightful no-bake dessert featuring a creamy, fluffy cheesecake filling combined with crunchy bits and fresh strawberries, all served in crisp waffle cones. Perfect for summer parties or a fun treat, these cones offer a beautiful blend of textures and flavors that everyone will love.
Ingredients
Cheesecake Filling
- 8 oz cream cheese, softened
- 1/2 cup powdered sugar
- 1 teaspoon vanilla extract
- 1 cup heavy cream
- 1/2 cup crunchy toppings (crushed graham crackers, nuts, or cereal)
Assembly
- 1 cup fresh strawberries, sliced
- 6–8 waffle cones, crispy and sturdy
Instructions
- Prepare the Cheesecake Filling: In a large bowl, beat the softened cream cheese with an electric mixer until it becomes smooth and creamy. Gradually add the powdered sugar and vanilla extract while continuing to mix until the batter reaches a silky and even consistency.
- Whip the Heavy Cream: In a separate chilled bowl, whip the heavy cream until stiff peaks form. This step adds lightness and volume to the filling, creating a fluffy cheesecake texture.
- Fold Whipped Cream Into Cheesecake Mixture: Gently fold the whipped cream into the cream cheese mixture using a spatula. Be careful not to deflate the mixture to maintain its airy and smooth texture.
- Add Crunchy Toppings: Stir in the crushed graham crackers or your choice of crunchy toppings into the filling to add a delightful texture contrast to the dessert.
- Assemble the Cones: Using a spoon or piping bag, carefully fill each waffle cone with the cheesecake mixture. Top each cone with sliced fresh strawberries and a sprinkle of extra crunchy topping to finish.
Notes
- Ensure the cream cheese is fully softened to avoid lumps in the filling.
- Chilling the bowl before whipping the heavy cream helps achieve better volume and stiffness.
- Use sturdy waffle cones to prevent sogginess and breakage when filled.
- Feel free to customize the crunchy toppings according to your preference, such as chopped nuts or your favorite cereal.
- Serve immediately for best texture, or keep refrigerated if preparing ahead.


